
NSX-T on VDS 7 Guide
Details
Last Updated: 07/2020
Details
This article provides information on reasons behind transitioning from the N-VDS (NSX Virtual Distributed Switch) to the VDS. This article also provides information about the API consumption impact of moving from N-VDS to VDS (7.0) and provides various illustrations and examples.
Solution
This article exists to guide you and VMware partners regarding the change of network representation from N-VDS to VDS. This change was introduced starting with VDS 7.0. This article provides detailed illustrations and API examples on how NSX users can interact with VDS and compares and contrasts it with N-VDS usage.
Table of Contents
• N-VDS Origins
• The reasons for running NSX-T on VDS
• Example scenarios
• NSX-T with N-VDS
• NSX-T on VDS
• NSX-T on multiple VDS
• NSX-T on VDS and N-VDS at the same time
• Identifying a segment in vCenter with logical switch UUID or segment path
• Current limitation in vCenter
• Federation scenario
• Duplicate names
• Same segment spanning multiple VDS
• Duplicate names in NSX-T
• Duplicate names in vCenter
• API Changes for NSX-T DVPG
• TransportNode API changes
• Consumption of NSX-T Segments through vSphere SDKs
• Example using pyvmomi
• Example 1: Attaching a network to VM using network name
• Example 2: Attaching a network to VM based on network ID
• Example using Terraform
• Example using Ansible
• Example 1: Creating N-VDS based Host Transport Nodes
• Example 2: Creating NSX DVPG based Host Transport Node
• Example with PowerCLI
• Getting LogicalSwitch UUID from NSX-API
N-VDS Origins
NSX-T was designed from the ground up as a network virtualization platform independent of vSphere. The goal was not to avoid vSphere of course, but rather to give NSX-T a larger span so that it can provide services beyond it. The same NSX-T can power multiple vCenters at the same time, expand to KVM, the Cloud or bare metal servers for example.
Another reason for decoupling from vSphere was to allow NSX-T to have its own release cycle, so that features and bug fixes would be independent of vSphere’s timeline. To achieve that feat, the NSX-T virtual switch, the N-VDS, is leveraging an already existing software infrastructure that was designed to allow vSphere to consume networking through a set of API calls to third party virtual switches. As a result, NSX-T segments are represented as “opaque networks”, a name clearly showing that those objects are completely independent and unmanageable from vSphere.
The reasons for running NSX-T on VDS
With NSX-T 3.0, it is now possible to run NSX-T directly on a VDS (the VDS version must be at least 7.0). On ESXi platform, the N-VDS was already sharing its code base with the VDS in the first place, so this is not really a change of NSX virtual switch but rather a change of how it is represented in vCenter. All the NSX features are preserved, including the capability of running across multiple vCenters and platforms. Those other platforms also maintain the N-VDS model, this change is only for ESXi hosts.
Here are the main drivers for this transition to VDS:
- Insufficient opaque network support in the community
Even if opaque networks were introduced publicly several years ago, way before NSX-T was developed, many vendors did not take this model into account. Hundreds of applications interacting with vSphere were only capable of handling a VDS (vSphere Distributed Switch) or a VSS (vSphere Standard Switch), completely ignoring the possibility of opaque networks. Sometimes, this lack of support prevented VMware customers from deploying NSX-T because some critical applications could not work.
- Simpler integration in vCenter
NSX-T is independent of vCenter, however, in almost 100% of the cases, customers deploying NSX-T on ESXi hosts would deploy it in conjunction with vCenter. Installing NSX-T directly on VDS makes the deployment of NSX-T straightforward as there is no need for re-assigning physical uplinks or migrating vmkernel interfaces.
- Consolidation of multiple development branches
That latter benefit is rather internal to VMware but still significant for customers. As mentioned above, the VDS and N-VDS are based on the same code but were managed on independent development branches. That means that any new feature or any bug fix had to be committed twice (if not more). The new model will eventually result in a single development branch, freeing engineering resources for more useful tasks.
It is important however to acknowledge a significant change: NSX-T is still independent of vCenter, in the way that it can still operate seamlessly across multiple vCenters. However, because it requires a VDS, NSX-T will now require vCenter in order to run on ESXi hosts. Again, we have not found this to be a problem for our customers (and the NSX-T licensing includes the use of a VDS for that case).
Example scenarios
This part introduces very simple examples illustrating the representation of an NSX-T segment in vCenter when running NSX-T with N-VDS or NSX-T on VDS. The specific differences between the models will be highlighted as an introduction to the resulting API changes that will be detailed in the next part.
NSX-T with N-VDS
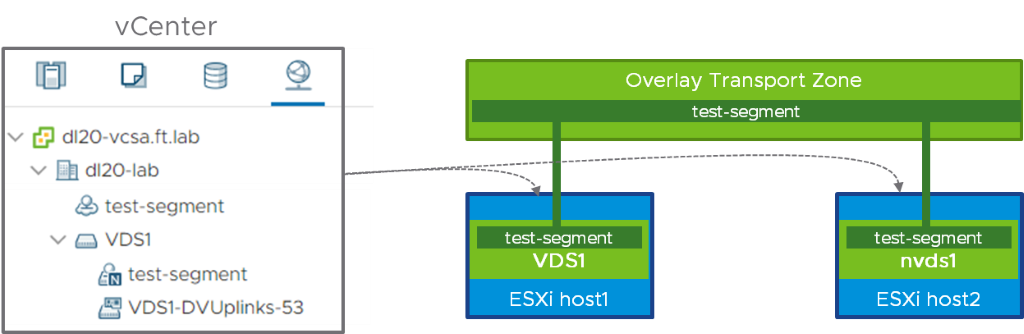
As a reminder, the span of an NSX-T segment is defined by the transport zone to which it belongs. Practically, it means that if you define “test-segment” in transport zone “Overlay”, this segment will be available for consumption on all the hosts attached to transport zone “Overlay”. The following diagram is representing this concept, with two hosts. Segment “test-segment” is part of an overlay transport zone, and the two hosts are prepared for NSX-T with an N-VDS (called “nvds1”).
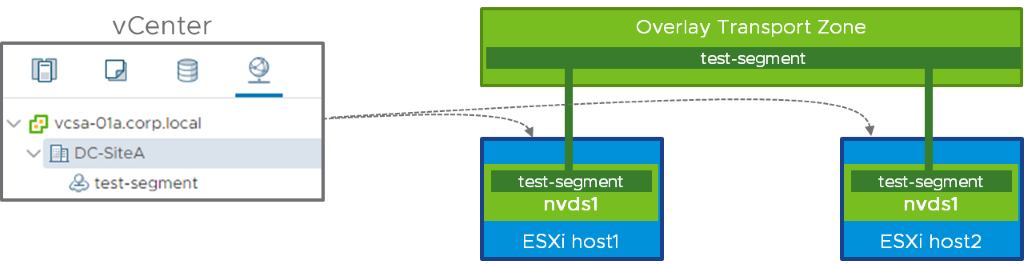
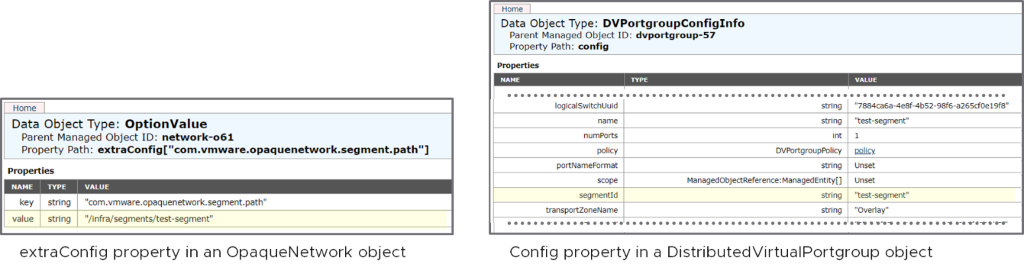
The left side of the diagram shows the opaque network representation of “test-segment” in vCenter. The administrator can directly attach the vNic of a VM on ESXi1 and ESXi2 to this segment by selecting the opaque network. The following is a MOB (Managed Object Browser) snapshot showing the information available on vCenter about the opaque network, highlighting the content of the “summary” and some of the “extraConfig”:
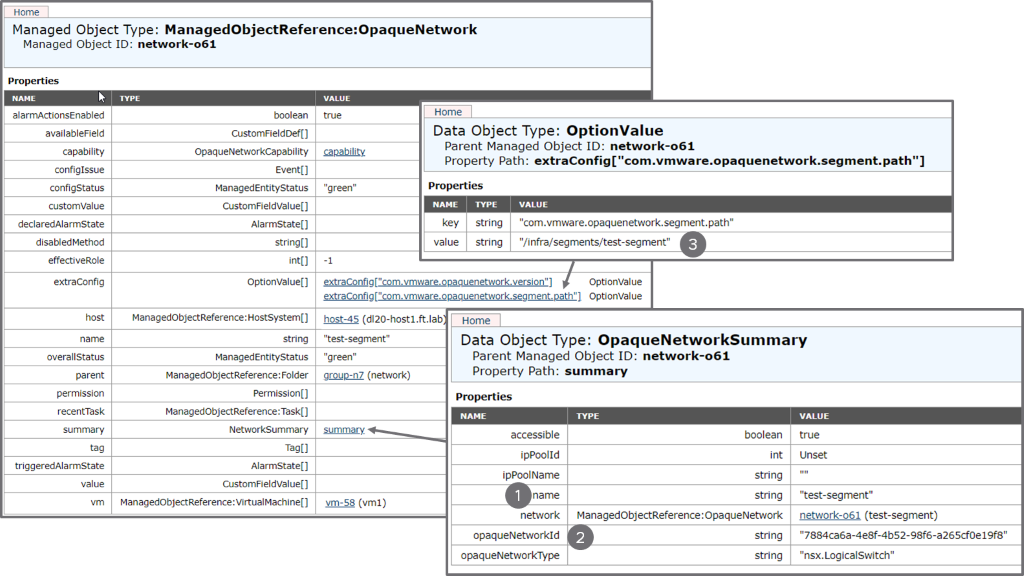
The main information related to this opaque network consists in:
- The name of the logical switch “test-segment”.
- The logical switch UUID: "7884ca6a-4e8f-4b52-98f6-a265cf0e19f8".
- When the opaque network is representing an NSX segment, the extraConfig fields also provides us with the segment path: "/infra/segments/test-segment". See part “Identifying a segment in vCenter” below for more on this.
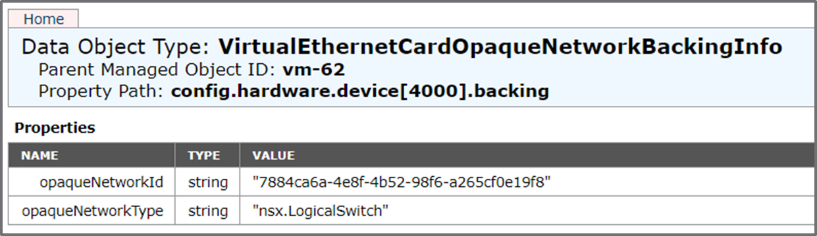
If a VM is attached to this opaque network, this is the corresponding backing info, showing the type of the network as well as the UUID of the logical switch:
NSX-T on VDS
Now, let’s take the exact same network, but this time, let’s prepare NSX-T on the top of a VDS1.
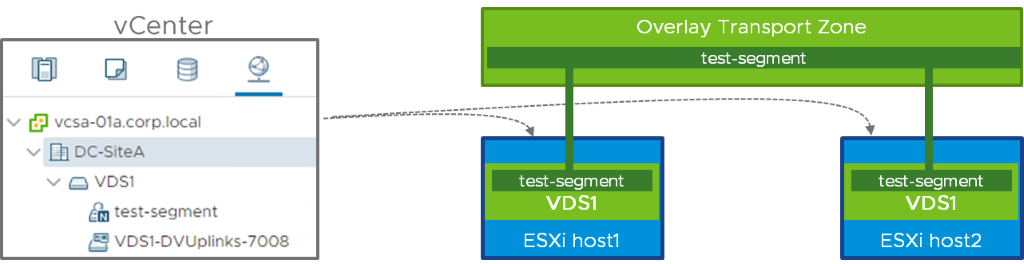
As you can see above, “test-segment” is now available on the two hosts as a dvportgroup. We call this an “NSX-T dvportgroup” because it is a dvportgroup representation of an NSX-T segment. The dvportgroup icon also features a little “N”, indicating that we’re dealing with an NSX-T object. There is however no functional difference from the perspective of the consumers of this NSX network: VMs can be attached to this NSX-T dvportgroup, just like they could be attached to the opaque network in the previous case. Because a dvportgroup belongs to a VDS, you can see that “test-segment” appears under “VDS1” in the hierarchy.
Let’s now have a look to this NSX-T dvportgroup using the MOB:
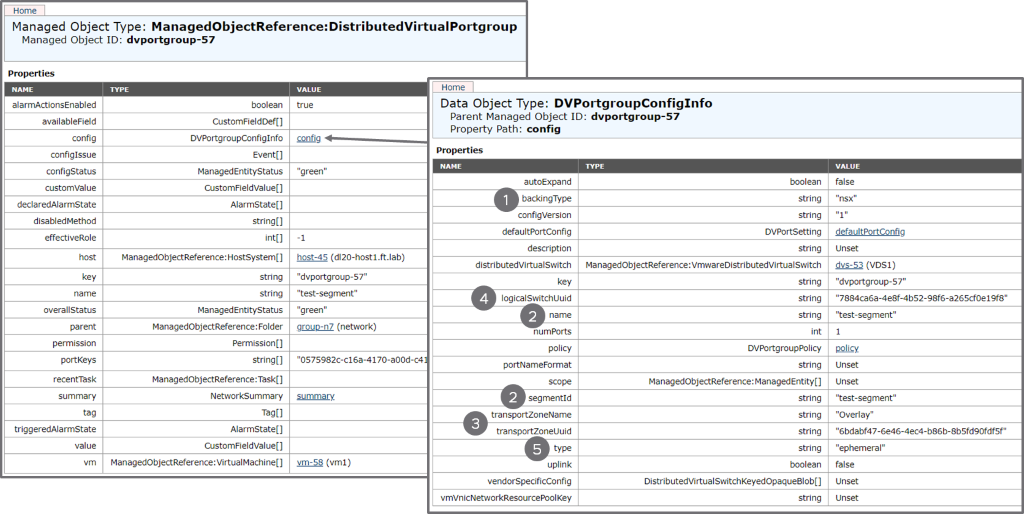
The left part is similar to what a regular dvportgroup would look like. The “config” section, represented on the right part of the diagram, reveal interesting additional information:
- There is a “backingType” with a value of NSX, clearly indicating that this is an NSX object.
- We get the segment name as well as the segment ID. Note that the two fields are identical in that specific scenario (more in “Identifying a segment in vCenter” part below.)
- We also get the name and UUID of the transport zone this segment belongs to in NSX-T.
- The logical switch associated to the segment is referred to by the “logicalSwitchUuid” field. You will notice that the value is the same as the “opaqueNetworkId” showing up in the previous N-VDS-based example. This is because, again, we are just representing the same object in vCenter in a different way.
- Finally, the type of an NSX-T dvportgroup is always “ephemeral”. This is not really an ephemeral dvportgroup in the traditional VDS sense of the term. We just did not want to introduce a new port type for ports controlled by NSX-T in order to avoid breaking existing scripts.
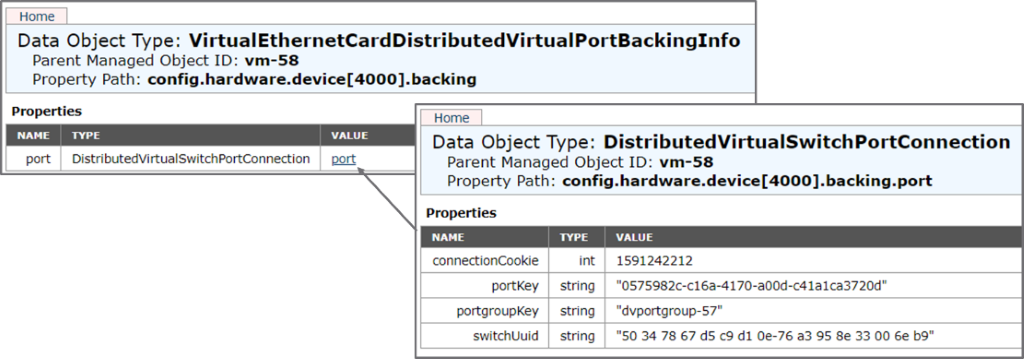
When a VM is attached to this NSX-T dvportgroup, the backing will just point to the NSX-T dvportgroup object described above:
NSX-T on Multiple VDS
In the previous example, our two hosts were prepared for NSX-T using the same VDS. It is however possible to have multiple VDS in the network and in this section, we are going to explore what’s happening when ESXi1 host is running NSX on the top of VDS1 while ESX2 host is running NSX-T on the top of VDS2, as represented below:
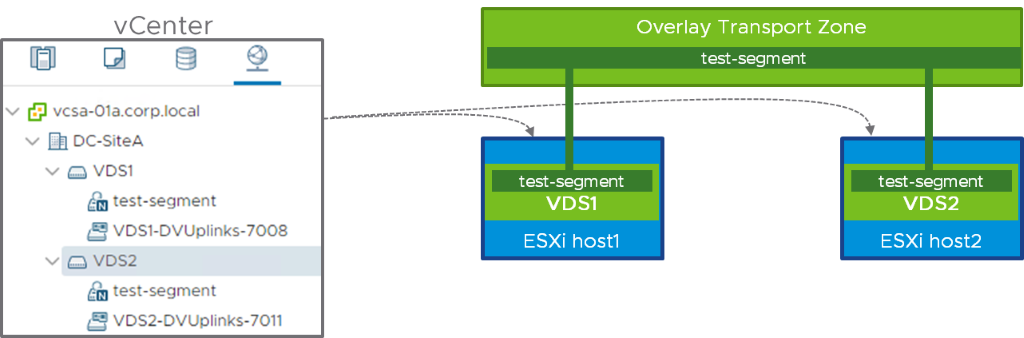
The vCenter network view, on the left part of the diagram, is showing VDS1 and VDS2, each with an NSX-T dvportgroup called “test-segment”. If you remember the initial part of this paper, we insisted that running NSX-T on VDS was mainly a different vCenter representation of the NVDS model, the functionality must however remain the same. So, in that case, the span of “test-segment” is still defined by the “Overlay” transport zone. ESXi host1 and host2 are attached to the same “Overlay” transport zone so the segments defined in “Overlay” must be available on host1 and host2. Because a dvportgroup is defined under a VDS in vCenter, we need to replicate the NSX-T dvportgroup on VDS1 and VDS2. Those two dvportgroups are in fact the representation of the same NSX-T segment, in two different VDS. This following screenshot is showing the information for the “test-segment” NSX-T dvportgroup under VDS2 in the MOB:
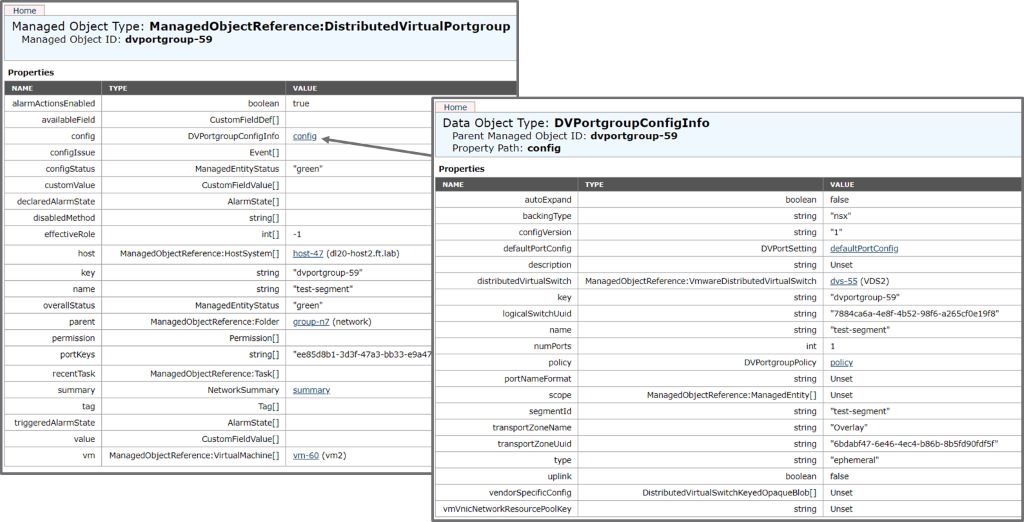
Here, you can see that the NSX-T dvportgroup under VDS2 has a different Managed Object ID (dvportgroup-59) than the one under VDS1 (dvportgroup-57). Those are two different vCenter objects. However, they are pointing to the same NSX-T segment (check the logicalSwitchUuid and segmentID fields in the detail of “config”, represented on the right end side of the above diagram).
Those familiar with NSX for vSphere will recognize this model (except that unlike NSX for vSphere, we are using the segment name for each NSX-T dvportgroup).
NSX-T on VDS and N-VDS at the same time
Just for the sake of completeness, it is also necessary to mention that it is perfectly possible and valid to have NSX-T with both VDS and N-VDS on the same network. The following diagram is showing an example of this scenario, where NSX-T is installed on a VDS in host1, while host2 was prepared with an N-VDS.
In that case, both the opaque network and the NSX-T dvportgroup representation of the segment “test-segment” will appear in vCenter.
Identifying a segment in vCenter with logical switch UUID or segment path
Until NSX-T 2.3, the object representing a layer 2 broadcast domain was a logical switch, uniquely identified in NSX by a logical switch UUID.
NSX-T 2.4 introduced the concept of segment for the same purpose. A segment is an object including a logical switch plus some few extra parameters, as represented below:

A segment is identified uniquely by a segment path. The segment used in this example has “/infra/segments/test-segment” as a segment path. The last part of the path (here “test-segment”) is called segment ID. In most cases, the segment ID is the name of the segment, but we’ll see in another example below that this is not the case when multiple segments with the same name exist in NSX.
So, if both logical switch ID and segment path can be used in order to identify a segment in your scripts, which one should you use? In the short term, because of a current limitation in the information pushed to vCenter, the logical switch ID is your best option. However, when this issue is fixed, the segment path is a more generic solution as it is simpler for the federation use case. See the two parts below.
Current limitation in vCenter
The identifier for a segment is a segment path. However, if this information is available for opaque networks, it is missing for NSX-T dvportgroups, for which we only have the segment ID.
Note that the segment path can still be retrieved from NSX, but this might not be an option for a vCenter admin who does not have the credentials to connect to the NSX Manager.
We are planning to show the full segment path in the segmentId property of the DVPortgroupConfigInfo in NSX-T 3.0.2 (creating a new segment path property on the top of the segment ID would take more time as it would depend on a vCenter release).
Federation scenario
The federation model allows the creation of a segment in a Global Manager. This kind of segment will have a slightly different segment path than the segments created on a Local Manager.
When those global segments are realized through a local manager, they will end up having different logical switch UUID on a per location basis:
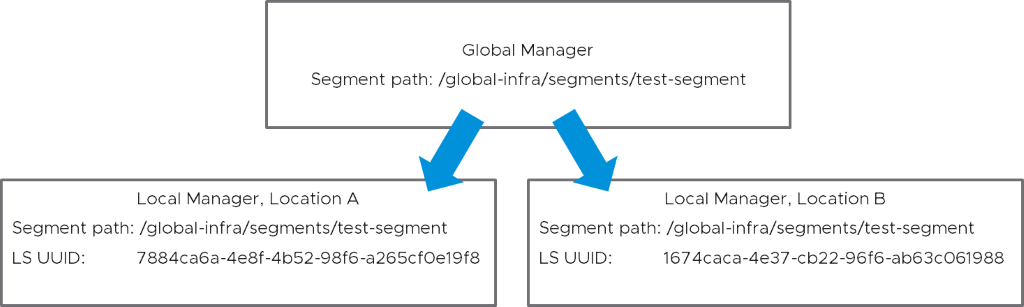
If you use LS UUID, your script must be location aware. Using the segment path, available post 3.0.2, will work irrespective of the location.
Duplicate names
Same segment spanning multiple VDS
As we have seen in the previous part, when a transport zone extends to multiple VDS prepared for NSX, each VDS will have an NSX-T dvportgroup for each segment of the transport zone. Those NSX-T dvportgroups are named after the segment they are representing, meaning that multiple dvportgroups have the same name. This is something that was not previously possible with vCenter: dvportgroups used to be unique across vCenter. Some scripts or automation tools that were identifying a dvportgroup based on name only must now accept an additional parameter specifying a VDS.
Duplicate names in NSX-T
The segment path is the unique identifier of a segment in NSX-T. It is thus perfectly possible for an adventurous network administrator to use the same name for multiple segments. NSX-T will make sure that the segment IDs are different though. Suppose that we are creating in our “Overlay” transport zone a second “test-segment”. You will notice that an additional string is appended to the segment ID of this new segment, so that it is different from the already existing one.
View in NSX-T Manager (you can access the segment ID by clicking on the three dot on the left of the segment):
View in vCenter:
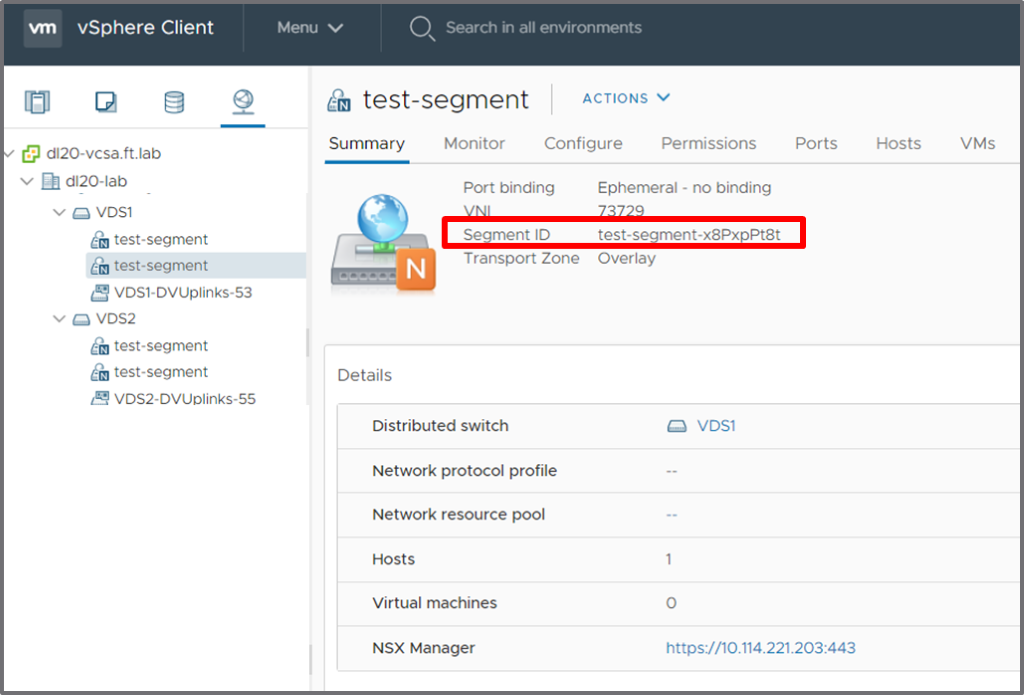
You can see that the new segment ID is: test-segment-x8PxpPt8t
It’s not very convenient to say the least, but this is the direct consequence of using duplicate names in the first place: Avoid that! At least, thanks to this segment ID, you can differentiate between segments bearing the same name.
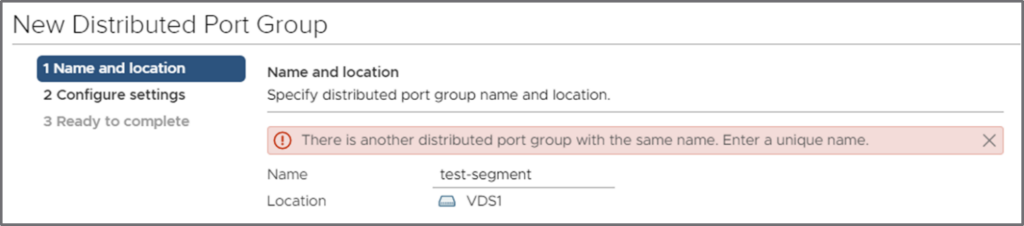
Duplicate names in vCenter
Note that vCenter will not let you create a dvportgroup with a name conflicting with an existing NSX-T dvportgroup:
However, if a dvportgroup say, “test” already exists under a VDS, NSX-T will have no problem creating an NSX-T dvportgroup “test”:
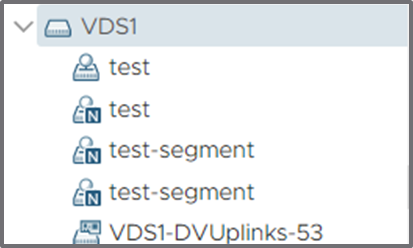
The two “test” dvportgroups do not have the same type here.
In summary, you can have a dvportgroups with the same name as an NSX-T dvportgroup, but the conflict can only be introduced from NSX-T.
API Changes for NSX-T DVPG
With the introduction of NSX-T VDS, consideration should also be given to Transport Node API changes for VDS in NSX-T Data Center 3.0 and above.
TransportNode API changes
Assume that NSX-T has a TransportZone with following configuration:
GET /api/v1/transport-zones/1d00e87e-beb4-4353-9d70-d71469508676
{
"display_name": "TZ-overlay",
"id": "1d00e87e-beb4-4353-9d70-d71469508676",
"transport_type": "OVERLAY",
"host_switch_name": "nsxvswitch"
}
Sample 2.5.x version payload to create N-VDS based TransportNode in above TransportZone. This payload will continue to work in 3.0.0. Note that the host_switch_name has to match the one given in the Transport Zone in NSX-T 2.5.x:
POST /api/v1/transport-nodes
{
"node_id": "<host-node-id>",
"host_switch_spec": {
"host_switches": [
{
"host_switch_name": "nsxvswitch",
"host_switch_type": "NVDS",
"host_switch_mode": "STANDARD",
"host_switch_profile_ids": [
{"key": "UplinkHostSwitchProfile", "value": "<profile-id>"},
{"key": "NiocProfile", "value": "<profile-id>"},
{"key": "LldpHostSwitchProfile", "value": "<profile-id>"},
],
"pnics": [{"device_name": "<pnic-device>", "uplink_name": "<uplink-name>"}],
"is_migrate_pnics": false,
"ip_assignment_spec": {
"resource_type": "AssignedByDhcp"
},
"vmk_install_migration": [],
"pnics_uninstall_migration": [],
"vmk_uninstall_migration": []
}
],
"resource_type": "StandardHostSwitchSpec"
},
"transport_zone_endpoints": [
{
"transport_zone_id": "1d00e87e-beb4-4353-9d70-d71469508676",
"transport_zone_profile_ids": [
{"resource_type": "BfdHealthMonitoringProfile", "profile_id": "<id>"}
]
}
],
"resource_type": "TransportNode",
"display_name": "TN1",
"description": "Sample TransportNode1",
}
Note: The TransportNode.host_switches attribute (deprecated in 1.1.0) has been removed in NSX-T Data Center 3.0.0.
NSX-T Data Center 3.0.0 allows user to create TransportNode with a different N-VDS name compared to above TransportZone:
{
"node_id": "<host-node-id>",
"host_switch_spec": {
"host_switches": [
{
"host_switch_name": "nvds1",
"host_switch_type": "NVDS",
"host_switch_mode": "STANDARD",
"host_switch_profile_ids": [
{"key": "UplinkHostSwitchProfile", "value": "<profile-id>"},
{"key": "NiocProfile", "value": "<profile-id>"},
{"key": "LldpHostSwitchProfile", "value": "<profile-id>"},
],
"pnics": [{"device_name": "<pnic-device>", "uplink_name": "<uplink-name>"}],
"is_migrate_pnics": false,
"ip_assignment_spec": {
"resource_type": "AssignedByDhcp"
},
"transport_zone_endpoints": [
{
"transport_zone_id": "1d00e87e-beb4-4353-9d70-d71469508676",
"transport_zone_profile_ids": [
{"resource_type": "BfdHealthMonitoringProfile", "profile_id": "<id>"}
]
}
],
"vmk_install_migration": [],
"pnics_uninstall_migration": [],
"vmk_uninstall_migration": []
}
],
"resource_type": "StandardHostSwitchSpec"
},
"resource_type": "TransportNode",
"display_name": "TN1",
"description": "Sample TransportNode1",
}
Note: The transport_zone_endpoints must be provided at host_switch level in order to use different N-VDS name. The TransportNode.transport_zone_endpoints attribute has been marked as deprecated in 3.0.0 and it will be removed in future release of NSX.
If vCenter Server 7.0 is added to NSX-T as a compute manager and vDS (version 7.0.0) exists in the vCenter Server, then a user can create vDS based TransportNode in the above TransportZone.
{
"node_id": "<host-node-id>",
"host_switch_spec": {
"host_switches": [
{
"host_switch_id": "<vds_uuid>",
"host_switch_type": "VDS",
"host_switch_mode": "STANDARD",
"host_switch_profile_ids": [
{"key": "UplinkHostSwitchProfile", "value": "<profile-id>"}
],
"pnics": [],
"uplinks": [
{"vds_uplink_name": "<vds-uplink>", "uplink_name": "<nsx-uplink>"}
],
"ip_assignment_spec": {
"resource_type": "AssignedByDhcp"
},
"transport_zone_endpoints": [
{
"transport_zone_id": "1d00e87e-beb4-4353-9d70-d71469508676",
"transport_zone_profile_ids": [
{"resource_type": "BfdHealthMonitoringProfile", "profile_id": "<id>"}
]
}
]
}
],
"resource_type": "StandardHostSwitchSpec"
},
"resource_type": "TransportNode",
"display_name": "TN1",
"description": "Sample TransportNode1",
}
Notes:
- For vDS based TransportNode, the host_switch_id is a mandatory field and host_switch_name is ignored. The host_switch_id is got from the property vim.DistributedVirtualSwitch.uuid.
- vmk and pnic install/uninstall mappings are not supported for vDS host-switch.
- pnics attribute of host_switch is not supported, instead, the user should connect uplinks from nsx uplink-profile to VDS uplink names.
- VDS uplink to pnic connectivity, Network IO Control and Link Discovery Protocol configuration will be done in vSphere by VI admin.
Link Aggregation Group Protocol will also be configured on vDS by the vSphere user. User can connect nsx uplinks to LAG using following payload:
{
"node_id": "<host-node-id>",
"host_switch_spec": {
"host_switches": [
{
"host_switch_id": "<vds_uuid>",
"host_switch_type": "VDS",
"host_switch_mode": "STANDARD",
"host_switch_profile_ids": [
{"key": "UplinkHostSwitchProfile", "value": "<profile-id>"}
],
"pnics": [],
"uplinks": [
{"vds_lag_name": "<LAG-name>", "uplink_name": "<nsx-uplink>"}
],
"ip_assignment_spec": {
"resource_type": "AssignedByDhcp"
},
"transport_zone_endpoints": [
{
"transport_zone_id": "1d00e87e-beb4-4353-9d70-d71469508676",
"transport_zone_profile_ids": [
{"resource_type": "BfdHealthMonitoringProfile", "profile_id": "<id>"}
]
}
]
}
],
"resource_type": "StandardHostSwitchSpec"
},
"resource_type": "TransportNode",
"display_name": "TN1",
"description": "Sample TransportNode1",
}
Note: The nsx uplink should connect to the full LAG object instead of individual ports in the LAG.
When working with NSX-T SDKs, building the HostSwitchSpec attribute class correctly to reflect the API changes is enough to create VDS based TransportNode. This could be in a TransportNode spec or a TrransportNodeProfile spec. No other changes are required.
Consumption of NSX-T Segments via vSphere SDKs
The consumption of NSX-T Segments is when a Virtual Machine is attached to it. Irrespective of whether the underlying network is an OpaqueNetwork or a standard DVPG or DVPG, the consumption goal is the same. A Virtual Machine should be able to attach to it. When trying to achieve this goal through an SDK, care has to be taken to make sure the right object reference and the correct object is selected if multiple portgroups of the same name are present. To provide more detail, below are some samples :
Example using pyvmomi
Note: The below samples require SDK v7.x.
$> pip3 show pyvmomi
Name: pyvmomi
Version: 7.0
Summary: VMware vSphere Python SDK
Home-page: https://github.com/vmware/pyvmomi
Author: VMware, Inc.
Example 1: Attaching a network to VM using network name
https://github.com/madhukark/pyvmomi-community-samples/blob/dev/samples/nsxt_change_vm_vif.py
Example 2: Attaching a network to VM based on network ID
This example shows how we can use the Segment ID or Logical Switch UUID available in NSX-T to attach the network to the Virtual Machine
https://github.com/madhukark/pyvmomi-community-samples/blob/dev/samples/nsxt_change_vm_vif_by_id.py
Example using Terraform
NSX-T Terraform provider can create Segments and vSphere Terraform Provider can be used to attach it to a Virtual Machine. Here is an example:
https://github.com/madhukark/nsxt-terraform-policy-3-tier-app
Example using Ansible
The Ansible module to create a new Transport Node uses APIs under the hood. So to create a Transport Node, use the standard module nsxt_transport_nodes:
https://github.com/vmware/ansible-for-nsxt/blob/master/examples/setup_infra/04_create_transport_nodes.yml
Based on what you provide as the input, N-VDS or NSX-TDVPG is created.
Example 1: Creating N-VDS based Host Transport Nodes (see the section for ‘transport_nodes’)
https://github.com/vmware/ansible-for-nsxt/blob/master/examples/setup_infra/setup_infra_vars.yml
Example 2: Creating NSX DVPG based Host Transport Node
As mentioned in the API changes to create NSX-T DVPG, the host_switch_spec field has to be modified to reflect the intent to create NSX-T DVPG. This is true while creating a Host Transport Node directly or while creating a Transport Node Profile (and applying it to a Cluster). The example below shows the latter:
Transport Node Profile variable:
"transport_node_profiles": [
{
"resource_type": "TransportNodeProfile",
"display_name": "TNP with NSX DVPG",
"host_switch_spec": {
"host_switches": [
{
"host_switch_id": "50 14 bf dc 06 0a 24 db-c3 68 72 e4 e8 d5 7f fb",
"host_switch_type": "VDS",
"host_switch_mode": "STANDARD",
"host_switch_profiles": [
{
"type": "UplinkHostSwitchProfile",
"name": "nsx-default-uplink-hostswitch-profile"
}
],
"pnics": [],
"uplinks": [
{
"vds_uplink_name": "Uplink 1",
"uplink_name": "uplink-1"
},
{
"vds_uplink_name": "Uplink 2",
"uplink_name": "uplink-2"
}
],
"ip_assignment_spec": {
"resource_type": "StaticIpPoolSpec",
"ip_pool_name": "Host-TEP-IP-Pool"
},
"transport_zone_endpoints": [
{
"transport_zone_name": "Overlay-TZ"
}
]
}
],
"resource_type": "StandardHostSwitchSpec"
},
"description": "TNP with NSX DVPG"
}
]
Playbook to create a Transport Node ProfileN. No changes here whether its for creating a NVDS based TNP or NSX DVPG based TNP.
---
- hosts: 127.0.0.1
connection: local
become: yes
vars_files:
- nsx_tnp_vars.yml
tasks:
- name: Create Transport Node Profiles
nsxt_transport_node_profiles:
hostname: "{{ nsx_node1.mgmt_ip }}"
username: "{{ nsx_username }}"
password: "{{ nsx_password }}"
validate_certs: "{{ validate_certs }}"
display_name: "{{ item.display_name }}"
resource_type: "{{ item.resource_type }}"
description: "{{ item.description }}"
host_switch_spec: "{{ item.host_switch_spec }}"
state: "{{ state }}"
with_items:
- "{{ transport_node_profiles }}"
Once created, the TNP can be applied to vSphere Clusters to prep them using the nsxt_transport_node_collections module.
Example with PowerCLI
Consuming the NSX Distributed PortGroup with PowerCLI is same as consuming any other Distributed Port Group. The PowerCLI Get-VDPortgroup CmdLet takes the name of the dvpg as an argument. It is recommend that the Distributed Switch info is also passed in the -VDSwitch argument. This helps identify the correct portgroup.
Example: Get-VDPortGroup -Name "MyVDPortGroup" -VDSwitch "MyVDSwitch"
In the case where a specific distributed port group needs to be referenced using the LogicalSwitch UUID, the ExtensionData can be used to filter on the specific UUID.
Example: Get-VDPortGroup -VDSwitch "MyVDSwitch" | where { $_.ExtensionData.Config.LogicalSwitchUuid -eq ‘9c6388c3-2ad6-41c6-bcaa-a23edefcea38’}
Getting LogicalSwitch UUID from NSX-API
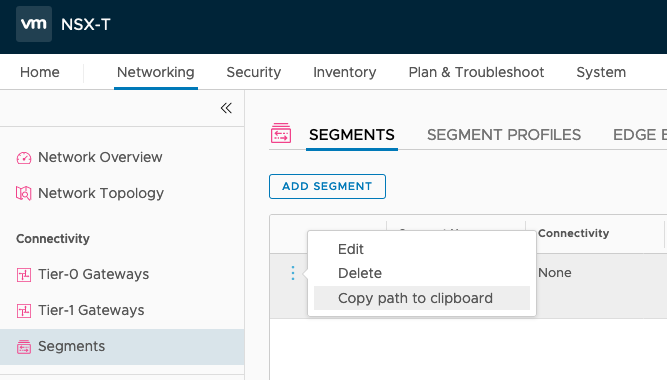
The LogicalSwitch UUID of a Segment can also be retrieved from NSX-T. You will need NSX-T credentials to be able to retrieve this information.
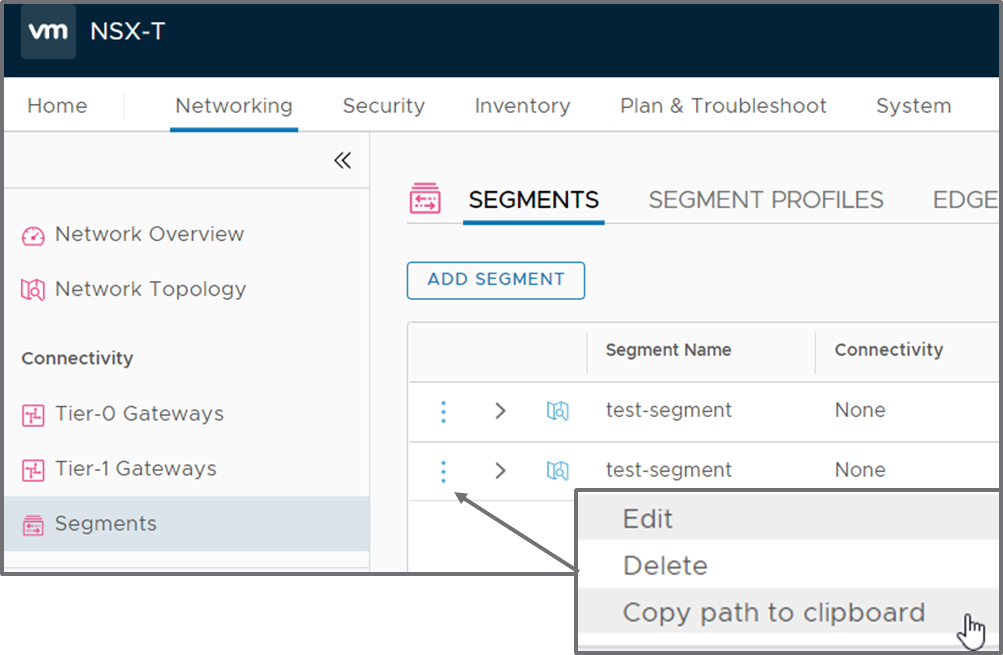
Step 1: Get the Path of the Segment you are interested in. As explained above, the path can be retrieved from the UI by clicking on the options for a Segment and copying the path to the clipboard.
Step 2: Get the realized entities to get the LogicalSwitch UUID:
GET /policy/api/v1/infra/realized-state/realized-entities and pass the path as intent_path. The unique_id in the Response is the UUID that can be used to uniquely identify the Segment.
GET /policy/api/v1/infra/realized-state/realized-entities?intent_path=/infra/segments/my-segment
Response:
{
"results": [
{
"extended_attributes": [
{
"data_type": "STRING",
"multivalue": false,
"values": [
""
],
"key": "connectivity_path"
},
{
"data_type": "STRING",
"multivalue": true,
"key": "l2vpn_paths"
}
],
"entity_type": "RealizedLogicalSwitch",
"intent_paths": [
"/infra/segments/my-segment"
],
"resource_type": "GenericPolicyRealizedResource",
"id": "infra-my-segment-ls",
"display_name": "infra-my-segment-ls",
"path": "/infra/realized-state/enforcement-points/default/logical-switches/infra-my-segment-ls",
"relative_path": "infra-my-segment-ls",
"parent_path": "/infra/realized-state/enforcement-points/default",
"unique_id": "983f0117-aa2d-43a3-a24b-73bbc66604cd",
"intent_reference": [
"/infra/segments/my-segment"
],
"realization_specific_identifier": "2e52ca3f-dd50-4671-a483-f508932fea5b",
"realization_api": "/api/v1/logical-switches/2e52ca3f-dd50-4671-a483-f508932fea5b",
"state": "REALIZED",
"alarms": [],
"runtime_status": "UNINITIALIZED",
"_create_user": "system",
"_create_time": 1593546086815,
"_last_modified_user": "system",
"_last_modified_time": 1593546087081,
"_system_owned": false,
"_protection": "NOT_PROTECTED",
"_revision": 3
}
],
"result_count": 1
}