
NSX-V to NSX-T 3.x Migration Coordinator
Purpose of this Document
Migrating to NSX Data Center, is top of mind for customers who are today on NSX for vSphere. Rich feature set and the diverse use cases supported by NSX-T are some of the driving factors for this desire to migrate to NSX Data Center. There are several approaches available to migrate from NSX-V to NSX-T including Migration Coordinator a built-in, automated migration tool, designed to help migrate from NSX for vSphere to NSX-T. This tool is fully supported by VMware and is built into NSX-T Manager Appliance.
In this white paper, we will take a look at the various migration approaches, their pros and cons and how Migration Coordinator helps enables these approaches.
Target Audience
This white paper is primarily for the benefit of customers who are currently using NSX-V. It focuses on the options available to migrate from NSX-V to NSX-T. Knowledge of both of NSX-V and NSX-T is essential for a successful outcome. Please check out the design guides for both versions of NSX.
Additionally, try out NSX-T in a lab environment to get hands-on experience with the product before embarking on a migration project.
Migration Approaches – High Level Overview
At a high level, there are three primary approaches—co-exist, lift and shift, and in-place—for migrating to NSX-T. These options are visualized in Figure 1.

Figure 1: High Level Migration Approaches
Co-Exist
In this model, NSX-T is deployed alongside NSX-V. The two infrastructures may share some hardware resources such as management and Edge clusters. Migration in this case is limited to deploying new apps in the new infrastructure and letting the old apps die over time. As the NSX-T environment grows and NSX-V environment shrinks, compute resources may be repurposed from NSX-V to NSX-T.
Figure 2 shows one possible design for the co-exist model. While only management is shared in this design, it would also be possible to share Edge clusters. In the case of NSX-T, customers may also choose to deploy bare metal Edges.
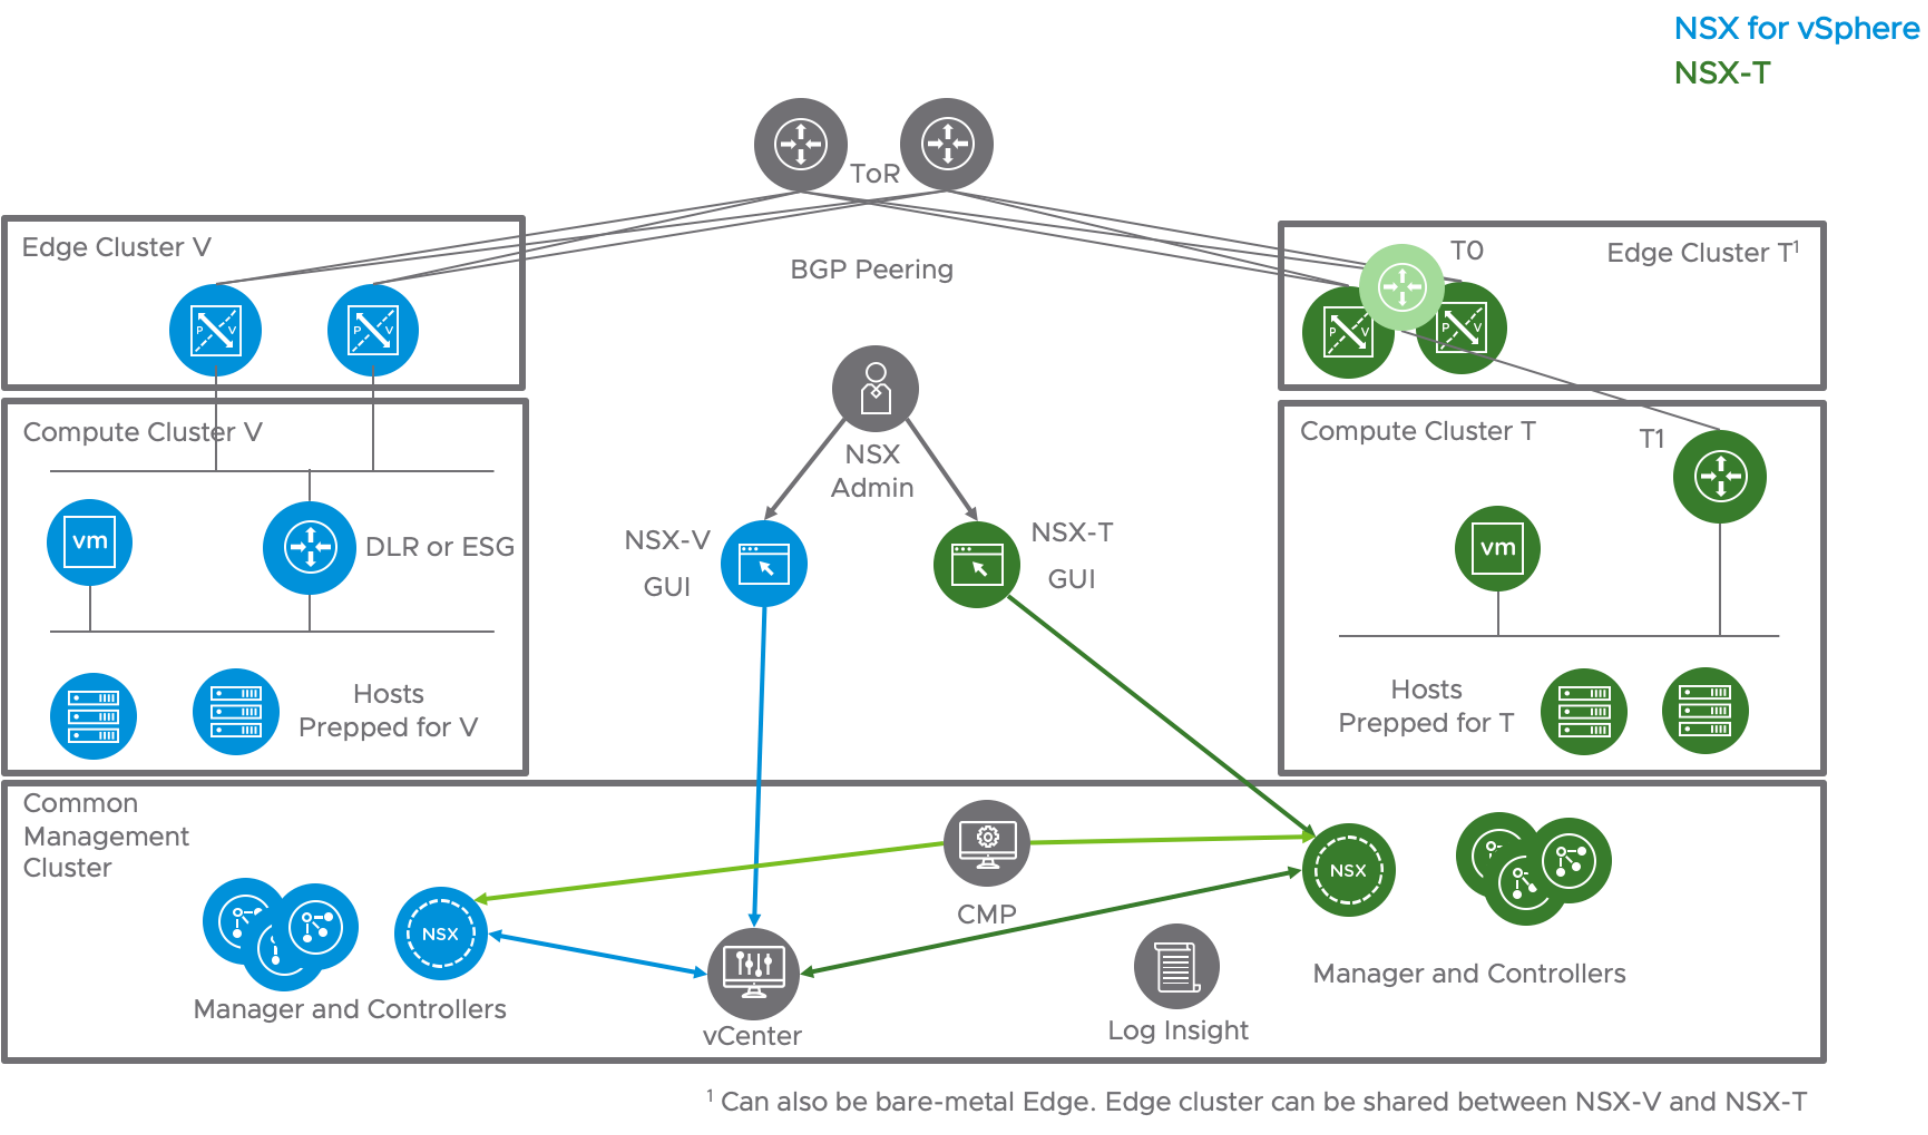
Figure 2 Co-Exist
This model is useful when planning to deploy NSX-T with a different architecture/design. In this case, NSX-T design does not depend on the existing NSX-V; however, there is an additional burden of managing two different infrastructures.
Lift-and-Shift Migration Model
With this method, NSX-T infrastructure is deployed in parallel along with the existing NSX-V infrastructure. The key difference from the co-exist model is migration of the configuration and workloads from NSX-V to NSX-T. In this model, there are two distinct steps of migration:
- Configuration Migration
- Workload Migration
Configuration Migration Approaches
There are several approaches available for configuration migration.
- Migration Coordinator - Modular Migration: Migration Coordinator is a free tool that is included in NSX-T Manager appliance. With the NSX-T 3.1 Data Center release, Migration Coordinator includes Modular Migration, a feature that enables configuration migration. In this first release, Modular Migration supports migrating firewall rules and groups via API.
- Scripting: An alternate approach is to use scripting if such expertise exists in house. Scripting provides flexibility in terms of how and what gets migrated; however, it may require significant effort.
- Third Party Tools: A third approach is to use a third party tool such as SPJ’s cITopus or RestNSX MAT.
This white paper will focus on the Migration Coordinator’s Modular Migration.
Advantages of Lift and Shift Migration
In the lift-and-shift model of migration, customers have the flexibility to both rearchitect and choose the components to migrate from NSX-V to NSX-T.
Design Flexibility
Modular Migration allows customers to rearchitect their NSX-T design. They could deploy a new edge design—ECMP or Active Standby—without matching it with their existing NSX-V. They could leverage the tier-0 and tier-1 constructs from the NSX-T in ways that may not have been possible or were not done with NSX-V.
Component Migration Flexibility
Modular Migration allows customers to choose what gets migrated. Options include:
- Which workloads are migrated over to NSX-T
- What hardware can be repurposed into NSX-T as the NSX-V workload footprint decreases.
Migration Timing Flexibility
Modular Migration also allows timing the migration based on workload requirements. In cases where there are multiple workloads, each with their own maintenance and downtime windows, Modular Migration would help break this down into multiple steps for individual workload migration.
Minimal Downtime
Modular Migration, in combination with NSX-T bridging and vSphere vMotion, helps minimize downtime while moving workloads over to NSX-T. There are two areas that could potentially contribute to downtime.
- Moving the north/south gateway over to NSX-T.
- Moving the workloads to NSX-T Data Center using vMotion.
Downsides to Lift-and-Shift Migration
While the lift-and-shift approach has benefits such as on-demand planning and migration based on workload requirements, there are certain downsides that need to be considered.
Separate hardware
NSX-T and NSX-V cannot coexist on a single host, so there is a need for separate HW to run NSX-T-based compute clusters. Separate does not necessarily mean new. Some customers have leveraged existing HW to carve out resources that can be released from NSX-V and reallocated to NSX-T. This approach is slower and requires moving hardware resources to NSX-T as workloads are migrated. Another approach is to use new hardware where the migration aligns with a refresh cycle. In this case, NSX-T could be installed on the new hardware.
vMotion
vMotion may be needed to move the existing workloads; however, vMotion has certain limitations which could result in downtime based on the approaches available. Review the KB article 56991, vMotion Between VDS/VSS and N-VDS (NSX-T switch), for more details.
Managing policy
A workload may exist in either of the two infrastructures. There may be a need to add or remove new workloads or to change the security posture. Care should be taken to update both infrastructures to ensure that these modifications do not compromise the security posture.
Managing two infrastructures
Plan for supporting two different environments for the duration of the migration.
In-Place Migration
The final model, in-place migration, leverages NSX-T’s built-in Migration Coordinator tool. Available since version 2.4, Migration Coordinator helps with replacing NSX-V in place on existing hardware. It imports an existing configuration for application on the new NSX-T infrastructure in a workflow that is similar to an upgrade with very little downtime. Migration Coordinator is also fully automated and has pre-migration checks to ensure successful migration.
The Migration Coordinator tool also supports maintenance mode, automatically placing ESXi hosts into maintenance mode and vMotioning VMs off before replacing the VIBs. This feature was introduced in NSX-T 3.0. The goal of this tool is to completely transform an existing NSX-V infrastructure into NSX-T. Later sections of this chapter will focus on Migration Coordinator.
Migration Coordinator Tool
This tool was initially introduced with NSX-T 2.4 and has had several updates increasing its usability and adding health check capabilities.
The following are steps are recommended during an NSX-T migration:
- Learn and try out NSX-T
- Learn more with curated learning paths on NSX Tech Zone
- Try out for free with an NSX-T Hands-on Lab
- Prepare NSX-V for migration
- Install NSX-T Manager appliances; Migration Coordinator is tool located within NSX-T
- Import configuration from NSX-V
- Check and resolve any configuration issues
- Migrate configuration
- Migrate Edges
- Migrate hosts
- Finish configuration
Migration Coordinator as an Assessment Tool for Migration
Migration Coordinator may also be used as an assessment tool to check whether the existing NSX-V environment is suitable for migration with Migration Coordinator. This is non-disruptive and does not make any changes to the NSX-V infrastructure.
Rollback
Migration Coordinator allows GUI-driven rollback for all the steps except the final step of moving the hosts to NSX-T. Since Migration Coordinator can stop after each cluster is migrated, its possible to use a small cluster with only a few nodes to validate the post-migration status prior to migrating the entire NSX-V infrastructure over to NSX-T.
Migration Steps in General
The following sections detail tasks recommended for both in-parallel and in-place migration.
Understand NSX
Before starting migration, get to know the differences between NSX-V and NSX-T. Since NSX-V is already in place and should be familiar, try building an NSX-T lab infrastructure and get to know that platform hands on. One option for this is to try out the Getting Started with NSX-T hands-on labs.
As mentioned previously, review the design guides for both the product lines to understand their full details:
Plan the Migration Approach
Understand the workloads that are running on NSX-V. This will help figure out whether a quick in-place migration or a longer in-parallel approach would be better.
Install NSX-T Manager Appliances and Edges
For both the in-parallel and in-place approaches, begin the migration process by installing the NSX-T Manager appliances. Some of these components may share resources with the existing NSX-V infrastructure. For example, NSX-T Manager appliances may be installed in the same management cluster as the older NSX-V Manager components.
Note that NSX-T Manager is installed via an OVA and not the Manager UI.
Import Configuration from NSX-V
The next step would be to import the configuration from the existing NSX-V infrastructure. Based on the chosen migration strategy, this could happen in couple of ways.
With an in-place migration using Migration Coordinator, configuration import is automated.
For the Lift and Shift migration, there are several approaches based on the migration strategy. Some customers like to start off fresh using a different design and security posture and move the workloads over. Others prefer to keep the new NSX-T infrastructure consistent with the existing infrastructure. With either approach, the new NSX-T infrastructure needs to be built up with the right networking components and security posture. Some parts of this migration, such as importing security posture, could potentially be automated.
Apply Configuration on NSX-T
The imported configuration needs to be applied on the NSX-T infrastructure. With the Migration Coordinator tool, using in-place approach, this step is a single-click automated process to move the entire configuration over to NSX-T. Even in the case of lift and shift, modular migration allows moving the DFW and Groups over with a single API call.
Lift and Shift Model – Migrating Workloads
At this point NSX-T infrastructure should be up and running with the right configuration and ready to accept workloads. Migrating workloads over could mean downtime based on the approach taken to migrate. To minimize downtime, use NSX-T Bridge. Details are in the workload migration section.
In-Place – Migrating Edges and Hosts
Migrate Edges
The next step is to move the north/south connectivity over to NSX-T. In this special instance migration, NSX-T is able to use VXLAN in addition to Geneve. Because of this feature, NSX-T Edges can talk to workloads on the existing NSX-V infrastructure and communicate with the existing NSX-V-based hosts and associated VTEPs.
Migrate Hosts
The final step in this process is to move the hosts over to NSX-T. Note that after this action, changes cannot be reverted.
Lift and Shift Migration
Modular Migration is a feature introduced with NSX-T 3.1 release. This feature enables Lift and Shift Migration approach to migrate DFW rules and groups. With the current release, this feature is available via API. The following section describes how to use Migration Coordinator for Lift and Shift Migration.
Lift and Shift Migration Prerequisites
Following are some prerequisites that need to be met before running Migration Coordinator’s Modular Migration. Some of the prerequisites, are generic to running Migration Coordinator.
- NSX for vSphere and the vSphere must be in stable green state
- Export version of Distributed Firewall must be set to 1000
- Migration Coordinator on the NSX-T Manager appliance must be enabled via ssh using the command “start service migration-coordinator”
- NSX-T Manager Appliance has a compute-manager connecting to vSphere with the source NSX-V instance.
- Change the default MAC address of the NSX-T virtual distributed router
Additional requirements to run Modular Migration include:
- No unpublished firewall rules on the NSX for vSphere
- NSX-T configured with the desired topology but with no user defined DFW rules
- NSX-T deployed with enough compute nodes to accommodate workloads migrated via vMotion
- Matching the VNI of the segments on the NSX-T side with the segment ID of logical segments on the NSX-V side
- To minimize downtime, deploy NSX-T bridge to extend each logical segment on the NSX-V into NSX-T Data Center segments.
Start Migration Coordinator Service
The service for Migration Coordinator is not started by default. You could use the UI to quickly check whether Migration Coordinator is running by looking under the system tab on top and migrate on the left side menu. Going to the migrate page before starting the Migration Coordinator service will display a message on top of screen stating that the Migration Coordinator needs to be enabled.

Figure 3 Migration Coordinator Service is disabled by default
This tool needs to be enabled from CLI. Log into the NSX-T Manager CLI and run the following command:
nsx-manager> start service migration-coordinator
Once the service is enabled, the migrate page on NSX-T UI changes to display the migration options. However, Modular Migration is only available via API in the current release. Hence, use the UI to only confirm whether the Migration Coordinator is running.
Matching VNI
To match the firewall rules and groups, the VNI (overlay id) of segments on the NSX-T Data Center side should match the segment ID of logical segments on the NSX-V side.
In Figure 4, the segment ID of App_Tier_Logical_Switch is 5001.

Figure 4 NSX-V Logical Switches - Showing Segment ID
When creating the matching segment on NSX-T, the VNI should match the corresponding logical switch. The NSX-T API allows specifying the overlay ID to use when creating a segment. For example, to create the segment “App” with the overlay ID: 5001, use the following API call:
|
URL: |
https://nsxt-manager/policy/api/v1/infra/segments/App?force=true |
|
Method: |
PATCH |
|
Payload: |
{ "type" : "ROUTED", "subnets" : [ {” "gateway_address" : "172.16.20.1/24", "network" : "172.16.20.0/24"" "} ], "connectivity_path" : "/infra/tier-0s/T0-GW-01", "transport_zone_path" : "/infra/sites/default/enforcement-points/default/transport-zones/1b3a2f36-bfd1-443e-a0f6-4de01abc963e", "overlay_id":5001, "admin_state" : "UP", "replication_mode" : "MTEP", "resource_type" : "Segment", "id" : "App", "display_name" : "App", "path" : "/infra/segments/App", "relative_path" : "App", "parent_path" : "/infra" } |
The command “get logical-switch” on the NSX-T CLI will help confirm the VNI used to create the segment App.

Figure 5 NSX-T Manager showing VNI (Overlay ID) of Segment App
This VNI, 5001, shown boxed in blue in Figure 4 helps match up the Segment App on the NSX-T Data Center to the App_Tier_Logical_Switch on the NSX for vSphere side.
NSX-T Bridge
To minimize migration downtime, use an NSX-T bridge stretching and connecting the logical segment on the NSX-T side with the logical switch on NSX-V. Have the north/south connectivity run from the NSX-T side.
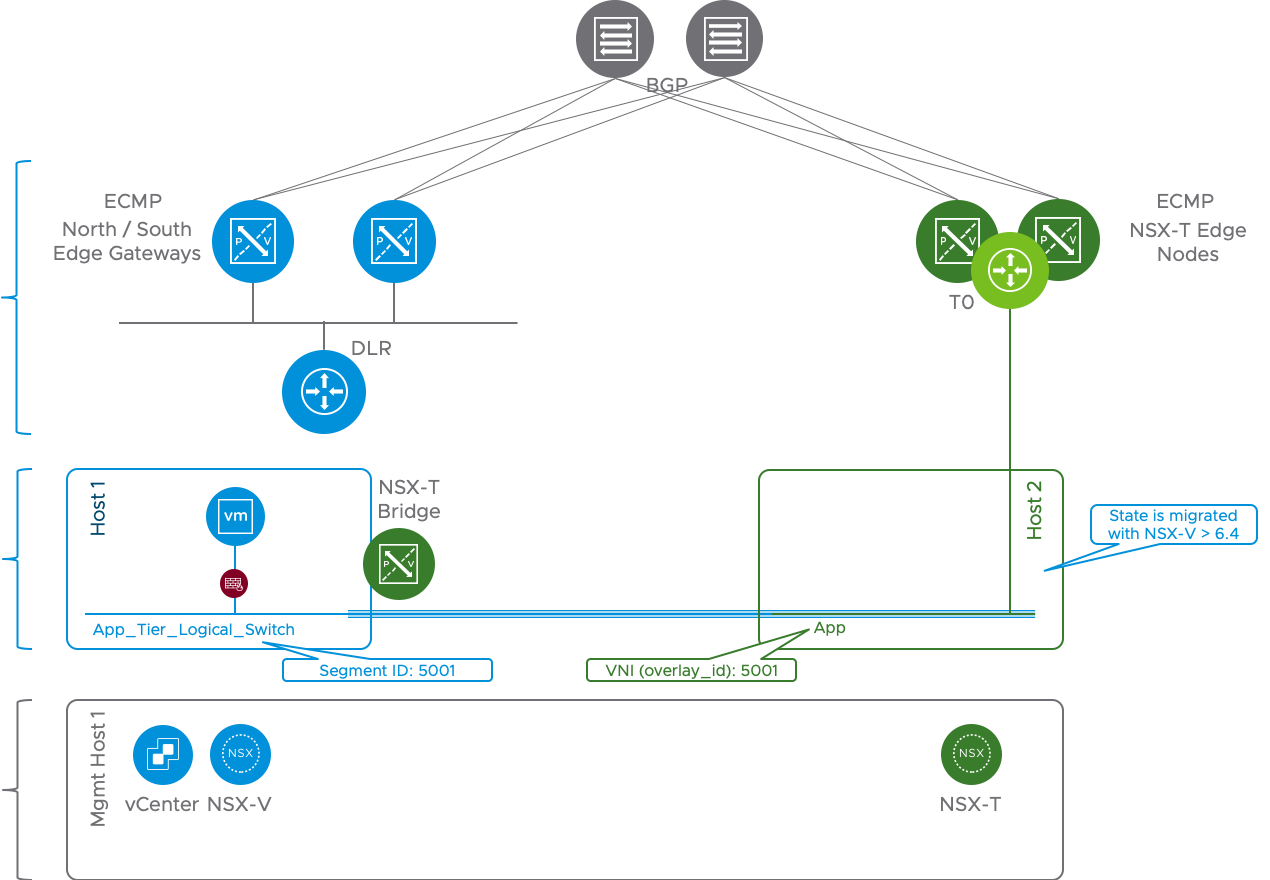
Figure 6 Bridging using NSX-T Bridge
Check out the NSX-T Bridging Section in this White Paper for details on how to configure and setup the Bridge. With this NSX-T bridge in place, once the DFW rules and groups are migrated over to NSX-T, workloads may be migrated over with minimum downtime.
Lift and Shift Migration Process
Similar to in-place migration, lift-and-shift migration with Migration Coordinator, is a simple five step process:
- Import configuration
- Resolve any configuration-related issues when migrating from NSX-V to NSX-T
- Migrate configuration to NSX-T
- Migrate workloads using vMotion APIs
- Finalize configuration
The following sections take a close look at the various API calls that are associated with each of these steps. All the APIs for migration are under “/api/v1/migration/”.
Import Configuration
Importing configuration requires connecting to the vSphere and the associated NSX-V instance. This can be accomplished with the following API call. To enable Modular Migration mode "migration_mode" parameter must be set to "DFW_ONLY".
|
URL: |
https://nsxt-manager/api/v1/migration/setup |
|
Method: |
POST |
|
Request Body |
{ "source_nsx" : [ { "ip" : "192.168.1.101", "nsx_username" : "admin", "nsx_password" : ”abc123", "vc_ip" : "192.168.1.11", "vc_username" : "administrator@vsphere.local", "vc_password" : ”abc123" } ], "destination_nsx" : { "destination_nsx_ip" : "localhost", "destination_nsx_port" : 443 }, "migration_mode" : "DFW_ONLY" } |
To check the configuration, use the get call to the same API https://nsxt-manager/api/v1/migration/setup.
Once the Modular Migration is configured and connected to the VC, the next step is to import the configuration. This process performs the following 3 steps:
- Check prerequisites
- Import config
- Translate config
To start this phase, use the following API:
|
URL: |
https://nsxt-manager/api/v1/migration/plan?action=start |
|
Method: |
POST |
|
Request Body |
|
Migration allows checking the status of this phase by using the following GET API:
|
URL: |
https://nsxt-manager/api/v1/migration/status-summary |
|
Method: |
GET |
|
Request Body |
|
Response shows the current status. In the following status message, Migration Coordinator is 25% done with collecting the config. Config Migration has not yet started.
{
"overall_migration_status" : "IN_PROGRESS",
"component_status" : [ {
"status" : "IN_PROGRESS",
"percent_complete" : 25.0,
"details" : "Collecting VC config",
"component_type" : "PRECHECK",
"can_skip" : false
}, {
"status" : "NOT_STARTED",
"percent_complete" : 0.0,
"component_type" : "CONFIG_MIGRATION",
"can_skip" : false
} ]
}
Note: This call may be used repeatedly during the migration process to check the status.
Once the import status is done and the status message changes to “PAUSED”, progress to the next stage.
Resolve Configuration Issues
This phase checks whether there are any items to resolve. For example, if a logical switch on the NSX-V side is missing a corresponding segment on the NSX-T side, any imports related to that logical switch are skipped. To get the full details use the following GET API:
|
URL: |
https://nsxt-manager/api/v1/migration/feedback-requests |
|
Method: |
GET |
|
Request Body |
|
This provides a list of items that need user input with the suggested options. This example contains an excerpt that calls out a missing VLAN and provides the option to either “skip” or “abort”:
{
"results" : [ {
"id" : "21d3480f79efe1a14ece08e3460c7a75780b2a5cc57381a30ff81b3b50fe207b-dvportgroup-148",
"v_object_id" : "dvportgroup-148",
"v_object_name" : "vMotion-RegionA01-vDS-MGMT",
"vertical" : "L2",
"sub_vertical" : "SWITCHING",
"message" : "Missing VLAN segment",
"suggested_action" : "skip",
"accepted_actions" : [ "skip", "abort" ],
In this phase, if there are missing items, the best method would be to roll back the import and make the necessary changes on either NSX-V or the NSX-T side.
Rollback
The import phase of Modular Migration not only imports the configuration but it also translates the config as it relates to NSX-T, checking for any issues. If any changes are required, on either the NSX-V or NSX-T side, this phase must be redone. Not only should the configuration be reimported, it also must be compared and retranslated to match the existing configuration on the NSX-T side. To rollback, use the following API:
|
URL: |
https://nsxt-manager/api/v1/migration/plan?action=rollback |
|
Method: |
POST |
|
Request Body |
|
Continue
Once the necessary changes are done, to continue again with the import that includes config import and translation along with check with NSX-T config, use the following API:
|
URL: |
https://nsxt-manager/api/v1/migration/plan?action=continue |
|
Method: |
POST |
|
Request Body |
|
Accept Recommended Actions
Once the configuration matches the desired outcome, if there are any more pending items, choose to accept all the recommended actions using the following API:
|
URL: |
https://nsxt-manager/api/v1/migration/feedback-response?action=accept-recommended |
|
Method: |
POST |
|
Request Body |
|
To check the status of all the items, the following feedback-requests API may be called again:
|
URL: |
https://nsxt-manager/api/v1/migration/feedback-requests |
|
Method: |
POST |
|
Request Body |
|
At this point, the Migration Coordinator is ready for the next step - the actual configuration migration to NSX-T.
Config Migration
Config migration stage has two parts. The first part migrates the firewall rules and the groups to NSX-T, while the second creates specific VIFs for each VM that will be migrated. This stage also creates IPSet-based rules for every VM that will be migrated to ensure there are no security gaps when moving to NSX-T. Notice the IPSet group “IPSet_SG-APP-securitygroup-33” in Figure 7 which is a corresponding IPSet based group for the group “SG-APP”.

Figure 7 NSX-T Groups - Temporary IPSets Created by Migration Coordinator
In this example, the SG-APP group definition also uses the IPSet based group:

Figure 8 Temporary IPSets Members
Config Migration – DFW and Groups
At this stage, Migration Coordinator is running but in a PAUSED state, allowing for config changes.
To start the config migration stage, simply call the continue API again:
|
URL: |
https://nsxt-manager/api/v1/migration/plan?action=continue |
|
Method: |
POST |
|
Request Body |
|
To track the Migration Coordinator status, use the GET status-summary API:
|
URL: |
https://nsxt-manager/api/v1/migration/status-summary |
|
Method: |
GET |
|
Request Body |
|
Config Migration - VIFs
Once the configuration is migrated over to the NSX-T, the second part of the Config Migration is to create VIFs for every VM that will be migrated over to NSX-T. This phase may be done in batches involving a set of VMs. Create a group for each VM set that will be migrated using the VM’s instance ID.
The instance ID for a VM may be located using the vSphere MOB browser or via API calls to vSphere. Figure 9 shows the InstanceUuid (5008f2c6-bab5-a6a1-475f-e91c32b46a1c) for the VM “app-01a.corp.local:

Figure 9 vCenter MOB - VM instanceUuid
Note: Operators familiar with the vSphere API and prefer API calls could use the “vm.config.instanceUuid” after the “vm = getObject(sinv, [vim.VirtualMachine], args.name, verbose=False)” call.
Use the VM Instance UUID in the Migrate Coordinator’s pre-migrate call to set up corresponding VIFs on the NSX-T. The following API call sets up the VIF for the VM “app-01a.corp.local”:
|
URL: |
https://nsxt-manager/api/v1/migration/vmgroup?action=pre_migrate |
|
Method: |
POST |
|
Request Body |
{ "group_id" : "vmGroupApp”, "vm_instance_ids" : ["5008f2c6-bab5-a6a1-475f-e91c32b46a1c"] } |
Note: vm_instance_ids is a comma separated list and may be used to include multiple VMs at the same time. This call creates VIFs on the NSX-T. Once the VIFs are created, the system is ready for the next stage. This involves migrating those VMs, which now have VIFs created, to NSX-T.
Workload Migration
To ensure the VM uses the proper VIF, use the vSphere API calls to vMotion the VM. For minimal downtime, use the NSX-T bridge that was created as part of the prerequisites. An example script to use the vMotion API is available in the resources section.
Finalize Migration
Finalizing migration is also two-step process. The first step involves the VIFs and the second step involves the config.
Finalize Migration – VIFs
In the first step, any configuration specific to the VIF is finalized. This includes applying tags to the corresponding VIFs to enable tag based dynamic groups. To finalize the VIF related configuration, use the post-migrate API:
|
URL: |
https://nsxt-manager/api/v1/migration/vmgroup?action=post_migrate |
|
Method: |
POST |
|
Request Body |
{ "group_id" : "vmGroupApp”, } |
Note: tags cannot be applied before moving the VM over to the NSX-T. A VM moved without tags would create a gap in security. The temporary IPSets, discussed in the config migration section, are used to ensure that there is no gap in security.
Finalize Migration – Config
The final step of the Migration Coordinator’s Modular Migration is to remove the temporary IPSets. This is accomplished with the following API call:
|
URL: |
https://nsxt-manager/api/v1/migration?action=finalize_infra |
|
Method: |
POST |
|
Request Body |
|
This step concludes the modular migration of DFW and groups. At this point, the NSX-T bridge may be removed as it is no longer required.
In-Place Migration
Migration Coordinator supports in-place migration, with a upgrade style workflow, since inception. With the NSX-T 3.0 release, Migration Coordinator also supports a automated maintenance mode that allows minimal downtime during host migration by leveraging vMotion. Following sections take a close look at using Migration Coordinator for in-place migration.
In-Place Migration Prerequisites
Before starting the in-place migration process using Migration Coordinator, ensure NSX-V is ready for migration. Apart from backing up the environment, following are some important prerequisites:
- NSX for vSphere and the vSphere must be in stable green state
- Export version of Distributed Firewall must be set to 1000
- VXLAN port must be set to 4789
- Migration Coordinator on the NSX-T Manager appliance must be enabled via ssh using the command “start service migration-coordinator”
- NSX-T Manager Appliance has a compute-manager connecting to vSphere with the source NSX-V instance.
For a full item checklist, refer to the Migration Coordinator guide, paying specific attention to the section Prepare NSX Data Center for vSphere Environment for Migration (NSX-T 3.0).
Install NSX-T Manager Appliances
As Migration Coordinator is available within the NSX-T Manager appliance, these appliances must be installed to start the migration process. While introduced with NSX-T 2.4, use version 2.5 or newer due to usability and health check enhancements.
The recommended approach for production workloads is to use a quorum of three 3 NSX-T Manager appliances. It may be acceptable, based on the type of workload, to start with just one. The implications of having a single NSX-T Manager should be considered before taking this approach.
Create IP Pool for Tunnel End Points
After the NSX-T Manager appliance installation, create an IP pool for tunnel endpoints (TEPs).

Figure 10 Create IP Pool for TEP
Install Edges
Install the required number of Edges with the amount of resources that match the existing NSX-V deployment.

Figure 11 Install Edge Nodes
Use the Migration Coordinator guide’s Determining NSX Edge Requirements (NSX-T version 2.5) section to figure out the right number of Edges and the right amount of resources for each Edge. The resolve configuration stage of the Migration Coordinator helps validate whether the Edges deployed are properly sized.
Add Compute Manager
Add a Compute Manager that points to the vCenter attached to the NSX-V deployment.
Click on System -> Fabric -> Compute Managers -> Add

Figure 12 Add Compute Managers – 1
Provide the details of the connected vCenter.

Figure 13 Add Compute Manager - 2
Accept the thumbprint from the vCenter.

Figure 14 Accept vCenter Thumbprint
At this point, a pop-up window may need to be resolved. If so, provide the username and password for vCenter and click resolve.

Figure 15 Add Compute Manager - Resolve - 1

Figure 16 Add Compute Manager - Resolve - 2
Confirm vCenter is connected.

Figure 17 Confirm vCenter is connected
Start Migration Coordinator Service
Migration Coordinator is available from the NSX-T UI under the system tab on top and migrate on the left side menu. The service for Migration Coordinator is not started by default. Going to the migrate page before starting the Migration Coordinator service will display a message on top of screen stating that the Migration Coordinator needs to be enabled.
Figure 18 Migration Coordinator Service is disabled by default
This tool needs to be enabled from CLI. Log into the NSX-T Manager CLI and run the following command:
nsx-manager> start service migration-coordinator
Once the service is enabled, the migrate page on NSX-T UI changes to display the migration options.
In-Place Migration Process
Start Migration
To start the migration, click on the GET STARTED button. A couple of things to note:

Figure 19 Migration Coordinator Wizard
Note:
- No changes are allowed during the migration process.
- Even though this is technically the start of the migration process, no changes have been made on the NSX-V side. The process may still be abandoned without any negative impact at this time.
Migration Coordinator has 5 main steps:
- Import configuration
- Resolve configuration
- Migrate configuration
- Migrate Edges
- Migrate hosts
The following sections take a close look at each of these steps.
Import Configuration
The import configuration step consists of two sub-steps:
- Authenticate to NSX-V
- Import configuration
Authentication
Click on Select NSX

Figure 20 Select NSX
Provide the NSX-V details. Use the vCenter details provided in the earlier step. Use the ADD NEW button for the vCenter field to add vCenter details if this has not yet been done.

Figure 21 Select NSX for vSphere
Once all the details are provided and verified, click on AUTHENTICATE.
Confirm that the authentication to NSX-V was successful.

Figure 22 Successful Authentication to NSX for vSphere
Import Configuration
The second step involves importing the configuration. Click on START button to begin.

Figure 23 Start Importing Configuration
Click on the IMPORT button to confirm the process.

Figure 24 Import Configuration - Click Import
At this point, Migration Coordinator imports the existing configuration from NSX-V. This does not make any changes to NSX-V, so it could be used for a quick check on the Migration Coordinator readiness of any setup.

Figure 25 Importing Configuration
View Imported Topology
Once the Migration Coordinator imports the configuration, view the existing NSX-v topology by clicking on the “View Imported Topology” link.

Figure 26 Topology Viewer
To go to the next step of the Migration Coordinator, click on the CONTINUE button.

Resolve Configuration
This stage focuses on resolving any configuration-related issues. To resolve, either accept the recommended value or, where applicable and available, tune it to match the required values.

Figure 27 Resolve Configuration Stage
The next two sections show examples of informational and interactive items that need resolution.
Informational Messages
One of the items under the L2 category is a message about a host that will not be migrated because NSX-V is not installed. In this case, user interaction is limited to simply to accepting the information.

Figure 28 Resolve Configuration - Informational Messages
To see the details, click on the message, then click ACCEPT to accept the recommendation.

Figure 29 Accept Recommendations
Interactive Messages
Some messages may need user interaction. For example, VTEP VLAN id for NSX-T Edge transport nodes. This may need a change based on specific requirements, as shown in Figure 30 and Figure 31.
![]()
Click on the above message to change the value:
Click on the message “VTEP VLAN id for NSX-T Edge Transport Nodes” to make a change.

Figure 31 Interactive Messages - Take Action
Submit Inputs
After all the changes/reviews within a category, select the SUBMIT button in the lower right to record the updates.

Figure 32 Resolve Configuration - Submit Inputs
Maintenance Mode Options
One of the options on the resolve configuration menu is selection of automated or manual maintenance mode.

Figure 33 Maintenance Mode
Clicking on the message allows configuration of maintenance mode for automated or manual operation. In automated maintenance mode, ESXi hosts are automatically placed in maintenance mode and the VMs moved automatically; this approach is recommended. In manual maintenance mode, Migration Coordinator will place the ESXi host in maintenance mode but will wait for user intervention to migrate the VMs out of the host.
Once all the changes are accepted and submitted, move to the next step.
Migration Configuration
This stage migrates the configuration from NSX-V to NSX-T. Any changes performed during the resolve configuration step are incorporated into this migration.

Figure 34 Migrate Configuration
Once the migration of configuration finishes, it displays a table of object types and their mapping results from NSX-V to NSX-T.

Move to the next phase, migrate edges, by clicking on CONTINUE.
Migrate Edges
Click on START to begin Edge migration.

Figure 35 Migrate Edges
This step expects pre-deployment of correctly sized NSX-T Edges. They must be suitable to support NSX-T with the topology deployed on NSX-V.

Figure 36 Migrate Edges - Rollback
Rollback
UI-driven rollback is supported even after migrating the Edges. Click on ROLLBACK if planning to roll back at this stage. Clicking CONTINUE will move to the final stage of migration, migrating hosts.
Migrate Hosts
This panel offers several options:
- Whether the migration should happen serially (i.e., one host at a time) or in parallel (i.e., all the hosts at the same time)
- Whether there should be a pause between each cluster
- Whether the migration should use maintenance mode; this is available in NSX-T release 3.0 and newer.

Figure 37 Migrate Hosts - Change Migration Mode
Select the correct options based on the requirements and click start.
Rollback is no longer available at this point. If rollback flexibility is desired, consider using a smaller 2-node test cluster to test the migration. Enable the pause between clusters and continue or roll back based on the outcome on the test cluster.
Workload Migration
There are two approaches available for workload migration:
- NSX-T bridging
- HCX
Note: Workload Migration is only necessary in the case of Lift and Shift approach. With In-Place, Migration Coordinator takes care of both config and workload migration.
NSX-T Bridging
In this approach, an NSX-T bridge is placed on a host that is prepared for NSX-V, with an uplink on the NSX-V segment to be bridged. This allows the bridge to take advantage of decapsulation of VXLAN frames on the ESXi host while only performing Geneve encapsulation. With this approach, one network may be bridged per Edge VM. Additionally, both NSX-V and NSX-T can share the same vCenter
Figure 38 shows the design for an NSX-T bridge-based approach for migrating workloads.

Figure 38 NSX-T Bridge
In this design, the recommended approach is to first move the gateway over to the NSX-T side, check the north/south connectivity for the workload, and then move the workloads over to the NSX-T side. With this approach, if there are any issues with the north/south connectivity after moving the bridge, the gateway can be moved back to the NSX-V side without needing to move the workloads.
Note: Use NSX-V version 6.4.4 or above to migrate firewall state.
Deploying the Edge Nodes for Bridging
It is important to be aware of two things which allow this technique:
- NSX-T Edge Node VM can be deployed on any ESXi since it has its own TEP. Encapsulation in Geneve is done at the VM level.
- At ESXi level, NSX-V VTEP decapsulate VXLAN before sending to the VM. This means VM running on NSX-V prepared hosts never see VXLAN encapsulation.
This means that an Edge Node VM running on a NSX-V prepared host will see packets without encapsulation coming from NSX-V overlay networks but will be able to send packets in the NSX-T overlay network. This aspect will be leveraged to bridge between NSX-V and NSX-T. Figure 39 shows details regarding the configuration of the NIC of the NSX-T Edge VM deployed on NSX-V host:
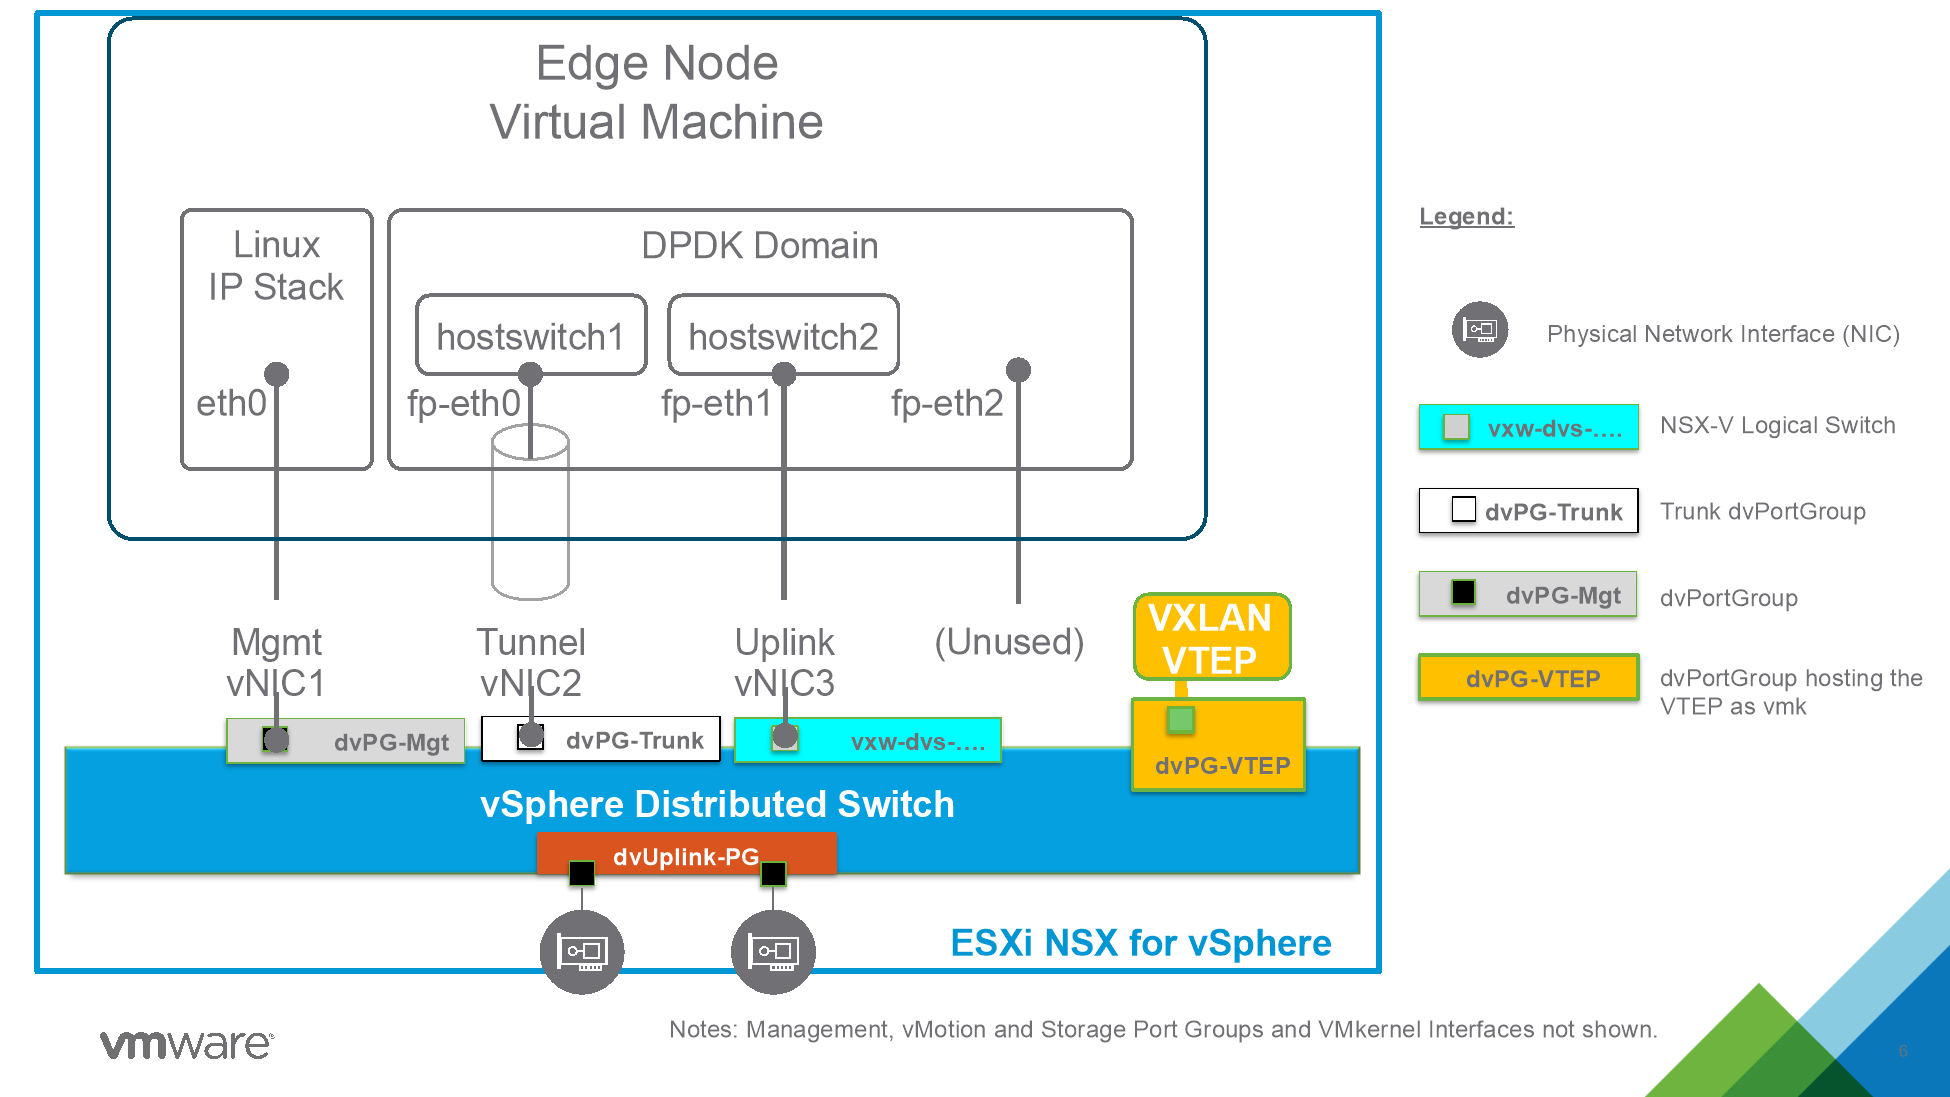
Figure 39 Edge Node Configuration for Bridging
The following need to be ensured:
- Management NIC needs to be able to reach NSX-T Managers.
- Tunnel NIC (TEP) must have connectivity the other NSX-T transport Nodes (ESXi hypervisor) allowing encapsulated frame (correct MTU set).
- The third NIC is connected directly to the NSX-V virtual wire we wish to bridge.
The connectivity requirements described between the NSX-T Edge Node and the other NSX-T components can be layer 2 or layer 3.
From a NSX-T configuration perspective, the Edge Node VM requires at least two transport Zones:
- Overlay Transport Zone
- VLAN Transport Zone
We will map those to the two hostswitches described previously:
- Hostswitch 1 associated with an Overlay Transport Zone
- This Transport Zone is the overlay transport zone shared with the ESXi transport nodes
- Hostswich 2 associated with a VLAN transport Zone
- Will be used to enable bridging from VLAN 0 (no dot1Q encapsulation). This will allow to bridge the virtual wire connected to this interface to a NSX-T segment
The Edge Node VM must then be made part of an Edge Cluster in NSX-T. If HA of the bridge is required at least two Edge Node VM with the same configuration must be made part of the cluster.
Configuring NSX-T Data Center Bridge between NSX-V and NSX-T
Since NSX-T 3.0.0 the configuration of the Edge Bridge is possible from the Policy API/UI, this is what this document will refer to. (Previous version can leverage the Manager API/UI to configure bridging).
Create an Edge Bridge Profile
The Edge Bridge Profile must be associated with the Edges nodes deployed on NSX-T.
It defines the Edge cluster used for bridging, the primary node, the backup node (optional) and failover policy. It is under Networking / Segments in the UI.

Figure 40 Edge Bridge Profile
For any question look at NSX-T Documentation on Edge Bridge: https://docs.vmware.com/en/VMware-NSX-T-Data-Center/3.1/administration/GUID-6EBA95A1-E27A-4364-AACC-64D5D6D40101.html
Configure the bridging on the segment
The bridging configuration is done on the NSX-T segment being bridged (Networking / Segments / Segment). In order to use Modular Migration Firewall it needs to be a segment with the same VNI than the NSX-V logical switch.

Figure 41 Segment
The Edge Bridge must be configured using the Edge Bridge Profile previously defined with some additional parameters:
- Transport Zone This is the VLAN Transport Zone configured previously on the Edge Node hostswitch 2.
- VLAN ID to 0 (packets received on hostswitch2 are not encapsulated).

Figure 42 Add Edge Bridge
Edit the NSX-V logical Switch to enable connectivity
The NSX-T Edge Node VM acts as a bridge, extending layer 2 between the NSX-V logical switch and the NSX-T segment. However, for this to work we need this VM to be able to send and receive packets with different MAC address than its own.
Enable MAC Learning and Forged Transmit
Since vSphere 6.7 MAC learning is a supported feature of the distributed virtual switch which can be enabled by API.
To validate what needs to be enabled we can look at the vCenter MOB.
First we need to get the dvportgroupId of the virtual wire where the Edge Node VM is connected. The simpler way to get it is to click on the object in the UI and get it from the URL.

Figure 43 Locating dvportgroupid via URL
From there we can go into the vCenter MOB and get a look at the configuration (under defaultPortConfig).
The URI to put in your browser is (replace vcenter with your vCenter address and replace {{dvportgroupId}} by your id): https://vcenter/mob/?moid={{dvportgroupId}}&doPath=config%2edefaultPortConfig
Here we see the parameter which interest us, the DVSMacManagementPolicy.

Figure 44 DVSMacManagementPolicy
Under this we need to set both forgedTransmits to true.
https://vcenter/mob/?moid={{dvportgroupId}}&doPath=config%2edefaultPortConfig%2emacManagementPolicy

Figure 45 ForgedTransmits
And also set macLearningPolicy to true, with a limit set to an integer (here 4096) and a limitPolicy (here “DROP”)
https://vcenter/mob/?moid={{dvportgroupId}}&doPath=config%2edefaultPortConfig%2emacManagementPolicy%2emacLearningPolicy

Figure 46 macLearningPolicy
This can be achieved using multiple automation tools like PowerCLI or pyvmomi (python).
Resources section of this whitepaper has an example script in Python.
In the case where your logical switch spans multiple DVS and creates multiple PortGroups keep the configuration consistent across all those PortGroups.
Note: An alternative before vSphere 6.7 is to use Promiscuous and Forged transmit (which can be configured from UI or API). However Promiscuous mode sends all packets to all machines which is why MAC learning is preferable. Also, explicitly set AllowUnicastFlooding to false to avoid unicast flooding which could result in CPU related issues
Note: The UI allows to configure Promiscuous and Forged Transmit, however it has been experienced that those configure DVSSecurityPolicy (deprecated in 6.7) and not DVSMacManagementPolicy as described earlier.
To work both with MAC learning or Promiscuous both parameter must be configured under DVSMacManagementPolicy.
Validate the connectivity across the Bridge
VM to VM
One simple way to test is to do a ping between VMs on both side of the bridge (one on NSX-V and one on NSX-T). Keep in mind that distributed firewall is here and depending the security policy might block connectivity.
A VM on NSX-T should also be able to ping the default gateway (which is at this point still on NSX-V).
From the Edge Node
Another thing to do is connect to the Edge Node as admin either through SSH or vSphere console and use the Bridge CLI commands to get the bridge status.
For example:

Figure 47 get bridge
Bridge CLI commands are described as part of generic NSX-T documentation.
HCX
A second approach to migrate workloads is to use HCX with its network extender capabilities. HCX Network Extension (NCX-NE) allows simultaneous bridging of multiple networks. This is useful in cases whether the applications are spread across multiple segments and need inter-app connectivity for extended periods of time during the migration.
Figure 48 shows the setup to migrate workloads using HCX.

Figure 48 HCX
Using HCX will allow bridging of 8 segments at a time per HCX-NE pair. This is especially useful if a workload spans multiple segments.
This approach will need:
- 2 x vCenters – one at the source and the other at the destination
- Each site must have an HCX Manager, HCX IX, and HCX-NE
Conclusion
There are multiple ways to migrate from NSX-V to NSX-T. Migration Coordinator provides a simple automated in-place approach with minimal downtime. Migration Coordinator also allows migrating only the DFW rules and security groups. NSX-T Bridge may be used, in combination with Migration’s Coordinator’s Modular Migration, to ensure minimal downtime during workload migration phase of Lift and Shift migration approach.
Please check out the lab to try a hands-on example.
Python Example Scripts
vMotion to a specific VIF
Notes on the script:
- This script is modified from the following source: https://github.com/dixonly/samples/blob/main/vmotion.py to allow vMotion to a specific VIF
- Modified version: https://github.com/samuelkommu/vc-samples/blob/main/vmotion.py
- This script expects a resource pool “nsxt” to be available on the destination cluster.
- This script is designed for Python 3
- Usage note below is for the case where source and destination vCenter is the same
Usage: python vMotionDL.py -s <vCenter> -u <vCenter username> -p <vCenter password> -l <Segment on NSX-T> -n <VM to vMotion> -e <Host to vMotion to>
# Copyright 2016-2020 VMware, Inc.
# SPDX-License-Identifier: BSD-2
# The BSD-2 license (the "License") set forth below applies for this entire script.
# You may not use this file except in compliance with the License.
# BSD-2 License
# Redistribution and use in source and binary forms, with or without modification, are permitted provided that the following
# conditions are met:
# Redistributions of source code must retain the above copyright notice, this list of conditions and the following disclaimer.
# Redistributions in binary form must reproduce the above copyright notice, this list of conditions and the following disclaimer
# in the documentation and/or other materials provided with the distribution.
#
# THIS SOFTWARE IS PROVIDED BY THE COPYRIGHT HOLDERS AND CONTRIBUTORS "AS IS" AND ANY EXPRESS OR IMPLIED WARRANTIES, INCLUDING,
# BUT NOT LIMITED TO, THE IMPLIED WARRANTIES OF MERCHANTABILITY AND FITNESS FOR A PARTICULAR PURPOSE ARE DISCLAIMED. IN NO EVENT
# SHALL THE COPYRIGHT HOLDER OR CONTRIBUTORS BE LIABLE FOR ANY DIRECT, INDIRECT, INCIDENTAL, SPECIAL, EXEMPLARY, OR CONSEQUENTIAL
# DAMAGES (INCLUDING, BUT NOT LIMITED TO, PROCUREMENT OF SUBSTITUTE GOODS OR SERVICES; LOSS OF USE, DATA, OR PROFITS; OR BUSINESS
# INTERRUPTION) HOWEVER CAUSED AND ON ANY THEORY OF LIABILITY, WHETHER IN CONTRACT, STRICT LIABILITY, OR TORT (INCLUDING NEGLIGENCE
# OR OTHERWISE) ARISING IN ANY WAY OUT OF THE USE OF THIS SOFTWARE, EVEN IF ADVISED OF THE POSSIBILITY OF SUCH DAMAGE.
#
# Purpose: vMotion to a specific VIF
#
#
from pyVim import connect
from pyVmomi import vim
from pyVmomi import vmodl
#from tools import tasks
import atexit
import argparse
import subprocess
import ssl
def parseParameters():
parser = argparse.ArgumentParser(
description='Arguments to connect to vCenter to add a hosts to a cluster')
parser.add_argument('-s', '--sourcevc',
required = True,
action = 'store',
help = 'Source Vcenter server name or IP')
parser.add_argument('-d', '--destvc',
required=False,
action='store',
help="Destination VC server name or IP")
parser.add_argument('-u', '--user',
required=True,
action='store',
help='User name to connect to vcenter')
parser.add_argument('-p', '--password',
required=True,
action='store',
help = 'Password for connection to vcenter')
parser.add_argument('-c', '--cluster',
required=False,
action='store',
help = 'Cluster name to poweron VM. Overides the --servers argument ')
parser.add_argument("-e", '--server',
required=False,
action = 'store',
help = "ESXi server to power on VM. Ignored if servers provided")
parser.add_argument('-v', '--datastore',
required=False,
help="Destination datastore volume")
parser.add_argument('-l', '--network',
required=False, nargs="*",
help="Destination network")
parser.add_argument("-n", '--name',
required = False,
action='store',
help = "VM name or name pattern to match for poweron ")
args = parser.parse_args()
if not args.server and not args.cluster:
print("Either destination server or cluster must be provided")
return False
return args
def getObject(inv, vimtype, name, verbose=False):
"""
Get object by name from vcenter inventory
"""
obj = None
container = inv.viewManager.CreateContainerView(inv.rootFolder, vimtype, True)
for i in container.view:
try:
if verbose:
print("Checking %s %s against reference %s" %(i.name, i._moId, name))
if i.name == name:
obj = i
break
except vmodl.fault.ManagedObjectNotFound:
#print("VM %s no longer exist")
# This is if object was deleted after container view was created
pass
return obj
def setupNetworks(vm, host, networks, vif_id):
# this requires vsphere 7 API
nics = []
for d in vm.config.hardware.device:
if isinstance(d, vim.vm.device.VirtualEthernetCard):
nics.append(d)
if len(nics) > len(networks):
print("not enough networks for %d nics on vm" %len(nics))
return None
netdevs = []
for i in range(0,len(nics)):
v = nics[i]
n = networks[i]
if isinstance(n, vim.OpaqueNetwork):
# Is the source opaque net same as destination?
opaque=False
if isinstance(v.backing, vim.vm.device.VirtualEthernetCard.OpaqueNetworkBackingInfo):
if v.backing.opaqueNetworkId == n.summary.opaqueNetworkId:
opaque=True
originalLs=v.backing.opaqueNetworkId
v.backing = vim.vm.device.VirtualEthernetCard.OpaqueNetworkBackingInfo()
v.backing.opaqueNetworkId = n.summary.opaqueNetworkId
v.backing.opaqueNetworkType = n.summary.opaqueNetworkType
v.externalId = vif_id
elif isinstance(n, vim.DistributedVirtualPortgroup):
# create dvpg handling
vdsPgConn = vim.dvs.PortConnection()
vdsPgConn.portgroupKey = n.key
vdsPgConn.switchUuid = n.config.distributedVirtualSwitch.uuid
v.backing = vim.vm.device.VirtualEthernetCard.DistributedVirtualPortBackingInfo()
v.backing.port = vdsPgConn
else:
v.backing = vim.vm.device.VirtualEthernetCard.NetworkBackingInfo()
v.backing.network = n
v.backing.deviceName = n.name
virdev = vim.vm.device.VirtualDeviceSpec()
virdev.device = v
virdev.operation = vim.vm.device.VirtualDeviceSpec.Operation.edit
netdevs.append(virdev)
return netdevs
def main():
print("This script is not supported by VMware. Use at your own risk")
args = parseParameters()
password = args.password
if hasattr(ssl, 'SSLContext'):
context = ssl.SSLContext(ssl.PROTOCOL_SSLv23)
context.verify_mode=ssl.CERT_NONE
si = connect.SmartConnect(host=args.sourcevc, user=args.user, pwd=password, sslContext=context)
else:
si = connect.SmartConnect(host=args.sourcevc, user=args.user, pwd=password)
if not si:
print("Could not connect to source vcenter: %s " %args.sourcevc)
return -1
else:
print("Connect to vcenter: %s" %args.sourcevc)
atexit.register(connect.Disconnect, si)
if not args.destvc or args.sourcevc == args.destvc:
di = si
else:
if hasattr(ssl, 'SSLContext'):
context = ssl.SSLContext(ssl.PROTOCOL_SSLv23)
context.verify_mode=ssl.CERT_NONE
di = connect.SmartConnect(host=args.destvc, user=args.user, pwd=password, sslContext=context)
else:
di = connect.SmartConnect(host=args.destvc, user=args.user, pwd=password)
if not di:
print("Could not connect to destination vcenter: %s " %args.destvc)
return -1
else:
print("Connect to vcenter: %s" %args.destvc)
atexit.register(connect.Disconnect, di)
sinv = si.RetrieveContent()
sdc = sinv.rootFolder.childEntity[0]
if args.destvc:
dinv = di.RetrieveContent()
ddc = dinv.rootFolder.childEntity[0]
else:
dinv = sinv
ddc = sdc
relocSpec = vim.vm.RelocateSpec()
#print(sinv)
#print(dinv)
if sinv != dinv:
if not args.server and not args.cluster and not args.datastore and not args.network:
print("XV Vmotion requires host, cluster, datastore, and network")
return None
up = vim.ServiceLocator.NamePassword(username=args.user, password=password)
sl = vim.ServiceLocator(credential=up,
instanceUuid=dinv.about.instanceUuid,
url="https://%s" % args.destvc)
relocSpec.service = sl
vm = getObject(sinv, [vim.VirtualMachine], args.name, verbose=False)
rp = getObject(sinv, [vim.ResourcePool], "nsxt")
print rp
if not vm:
print("VM %s not found" %args.name)
return
else:
print("VM %s %s found" % (vm.name, vm._moId))
host=None
if args.server:
host = getObject(dinv, [vim.HostSystem], args.server)
if not host:
print("Host %s not found" %args.server)
return
else:
print("Destination host %s found." % host.name)
cluster=None
if args.cluster:
cluster = getObject(dinv, [vim.ClusterComputeResource], args.cluster)
if not cluster:
print("Cluster %s not found" % args.cluster)
return
else:
print("Destination cluster %s found, checking for DRS recommendation..." % cluster.name)
if host and host.parent.resourcePool != cluster.resourcePool:
print("Destination host %s and cluster %s are not resource pool"
%(host.name, cluster.name))
return
if not cluster.configuration.drsConfig.enabled and not host:
print("Destination cluster %s is not DRS enabled, must specify host"
%cluster.name)
return
if not host and cluster.resourcePool == vm.resourcePool:
print("Must provide host when migrating within same cluster")
return
if not host:
rhost = cluster.RecommendHostsForVm(vm=vm, pool=cluster.resourcePool)
if len(rhost) == 0:
print("No hosts found in cluster %s from DRS recommendation for migration"
%args.cluster)
return
else:
print("DRS recommends %d hosts" %len(rhost))
host = rhost[0].host
if host:
relocSpec.host = host
relocSpec.pool = rp
if cluster:
#relocSpec.pool = cluster.resourcePool
relocSpec.pool = rp
datastore=None
if args.datastore:
datastore = getObject(dinv, [vim.Datastore], args.datastore)
if not datastore:
print("Datastore %s not found" % args.datastore)
return
else:
print("Destination datastore %s found." % datastore.name)
relocSpec.datastore = datastore
networks=[]
for n in args.network:
print("Searching VCenter for destination network(s)")
network = getObject(dinv, [vim.Network], n, verbose=False)
if not network:
print("Network %s not found" % args.network)
return
else:
print("Destination network %s found." % network.name)
networks.append(network)
devices = vm.config.hardware.device
nic_devices = [device for device in devices if isinstance(device, vim.vm.device.VirtualEthernetCard)]
vnic_changes = []
for device in nic_devices:
vif_id = vm.config.instanceUuid + ":" + str(device.key)
netSpec=setupNetworks(vm, host, networks, vif_id)
relocSpec.deviceChange = netSpec
print("Initiating migration of VM %s" %args.name)
vm.RelocateVM_Task(spec=relocSpec, priority=vim.VirtualMachine.MovePriority.highPriority)
if __name__ == "__main__":
main()
Enable MAC Learning and Forged Transmit on Port Group
Notes on the script:
- Original script location: https://github.com/tvigneron/vc-script-repo/blob/main/enable_maclearning.py
- This script is based on Python 3
Usage: python enable_maclearning.py -s <vCenter> -u <vCenter username> -p <vCenter password> -pg <portgroup>
# Copyright 2016-2020 VMware, Inc.
# SPDX-License-Identifier: BSD-2
# The BSD-2 license (the "License") set forth below applies to all parts of the NSX - Performance Testing Scripts project.
# You may not use this file except in compliance with the License.
# BSD-2 License
# Redistribution and use in source and binary forms, with or without modification, are permitted provided that the following
# conditions are met:
# Redistributions of source code must retain the above copyright notice, this list of conditions and the following disclaimer.
# Redistributions in binary form must reproduce the above copyright notice, this list of conditions and the following disclaimer
# in the documentation and/or other materials provided with the distribution.
#
# THIS SOFTWARE IS PROVIDED BY THE COPYRIGHT HOLDERS AND CONTRIBUTORS "AS IS" AND ANY EXPRESS OR IMPLIED WARRANTIES, INCLUDING,
# BUT NOT LIMITED TO, THE IMPLIED WARRANTIES OF MERCHANTABILITY AND FITNESS FOR A PARTICULAR PURPOSE ARE DISCLAIMED. IN NO EVENT
# SHALL THE COPYRIGHT HOLDER OR CONTRIBUTORS BE LIABLE FOR ANY DIRECT, INDIRECT, INCIDENTAL, SPECIAL, EXEMPLARY, OR CONSEQUENTIAL
# DAMAGES (INCLUDING, BUT NOT LIMITED TO, PROCUREMENT OF SUBSTITUTE GOODS OR SERVICES; LOSS OF USE, DATA, OR PROFITS; OR BUSINESS
# INTERRUPTION) HOWEVER CAUSED AND ON ANY THEORY OF LIABILITY, WHETHER IN CONTRACT, STRICT LIABILITY, OR TORT (INCLUDING NEGLIGENCE
# OR OTHERWISE) ARISING IN ANY WAY OUT OF THE USE OF THIS SOFTWARE, EVEN IF ADVISED OF THE POSSIBILITY OF SUCH DAMAGE.
#
# Purpose: Enables MAC Learning and Forged Transmit on a given PortGroup
#
#
from pyVim.connect import SmartConnect
import ssl
from pyVmomi import vim
import time
import argparse
#Put relevant informations for your environment:
def parseParameters():
parser = argparse.ArgumentParser(
description='Arguments to connect to vCenter')
parser.add_argument('-s', '--sourcevc',
required = True,
action = 'store',
help = 'Vcenter server name or IP')
parser.add_argument('-u', '--user',
required=True,
action='store',
help='User name to connect to vcenter')
parser.add_argument('-p', '--password',
required=True,
action='store',
help = 'Password for connection to vcenter')
parser.add_argument('-pg', '--portgroup',
required=True,
action='store',
help= 'PortGroup (name) on which to set MAC Learning and Forged Transmit')
args = parser.parse_args()
return args
def connect_vcenter(sourcevc, user, password):
context = ssl._create_unverified_context()
si= SmartConnect(host=str(sourcevc), user=str(user), pwd=password,sslContext=context)
return si
def get_all_objs(content, vimtype):
obj = {}
container = content.viewManager.CreateContainerView(content.rootFolder, vimtype, True)
for managed_object_ref in container.view:
obj.update({managed_object_ref: managed_object_ref.name})
return obj
def wait_for_task(task, actionName='job', hideResult=False):
while task.info.state == vim.TaskInfo.State.running or str(task.info.state) == "queued":
time.sleep(2)
if task.info.state == vim.TaskInfo.State.success:
output = 'Success.\n The task %s completed successfully.' % actionName
print(output)
else:
output = 'The task %s failed and did not complete successfully: %s' % (actionName, task.info.error)
raise task.info.error
print(output)
return task.info.result
def enable_maclearning_forgedtransmit(si, content, portgroup):
for virtualportgroup in get_all_objs(content, [vim.dvs.DistributedVirtualPortgroup]):
if virtualportgroup.name == portgroup:
spec = vim.dvs.DistributedVirtualPortgroup.ConfigSpec()
spec.defaultPortConfig = vim.dvs.VmwareDistributedVirtualSwitch.VmwarePortConfigPolicy()
spec.configVersion = virtualportgroup.config.configVersion
spec.defaultPortConfig.macManagementPolicy= vim.dvs.VmwareDistributedVirtualSwitch.MacManagementPolicy()
spec.defaultPortConfig.macManagementPolicy.macLearningPolicy= virtualportgroup.config.defaultPortConfig.macManagementPolicy.macLearningPolicy
spec.defaultPortConfig.macManagementPolicy.inherited = False
spec.defaultPortConfig.macManagementPolicy.macLearningPolicy.enabled = True
spec.defaultPortConfig.macManagementPolicy.macLearningPolicy.inherited = False
spec.defaultPortConfig.macManagementPolicy.macLearningPolicy.limit = 4096
spec.defaultPortConfig.macManagementPolicy.macLearningPolicy.limitPolicy = "DROP"
spec.defaultPortConfig.macManagementPolicy.forgedTransmits = True
task = virtualportgroup.ReconfigureDVPortgroup_Task(spec = spec)
wait_for_task(task, si)
if __name__ == "__main__":
#Get user input from CLI
args = parseParameters()
print(args.sourcevc, args.user, args.password, args.portgroup)
#Initiate a session to vCenter
si = connect_vcenter(args.sourcevc, args.user, args.password)
content = si.content
#Enable Mac learning and forged transmit
enable_maclearning_forgedtransmit(si, content, args.portgroup)
References
Documentation:
- VMware NSX-T Data Center Documentation provides a list of resources, including API and CLI guides
- NSX-T Data Center Migration Coordinator Guide
Design Guides on NSX-T:
Try out NSX-T for free:
Other resources